Basic Hardware Troubleshooting Guide
Common printer, monitor, calibrator and colour-tool problems and how to fix them, covering Epson SureColor P-series printers, Eizo CG/CS and BenQ SW/PD monitors, Calibrite Display and Datacolor Spyder calibrators, and the Palette Cube and Pico. Setup habits that prevent trouble, plus a scannable symptom-and-fix list for each, written for no technical background.
Monitor Troubleshooting
Tips and setup
Use the cables that came in the box, and connect the monitor straight to the computer rather than through a dock or hub, since docks are a common and well-disguised cause of display and calibration faults. See Checking USB Device Connections.
See Getting Started With Your New Monitor, and Prepare For Monitor Calibration & Calibration Goals.
Connecting
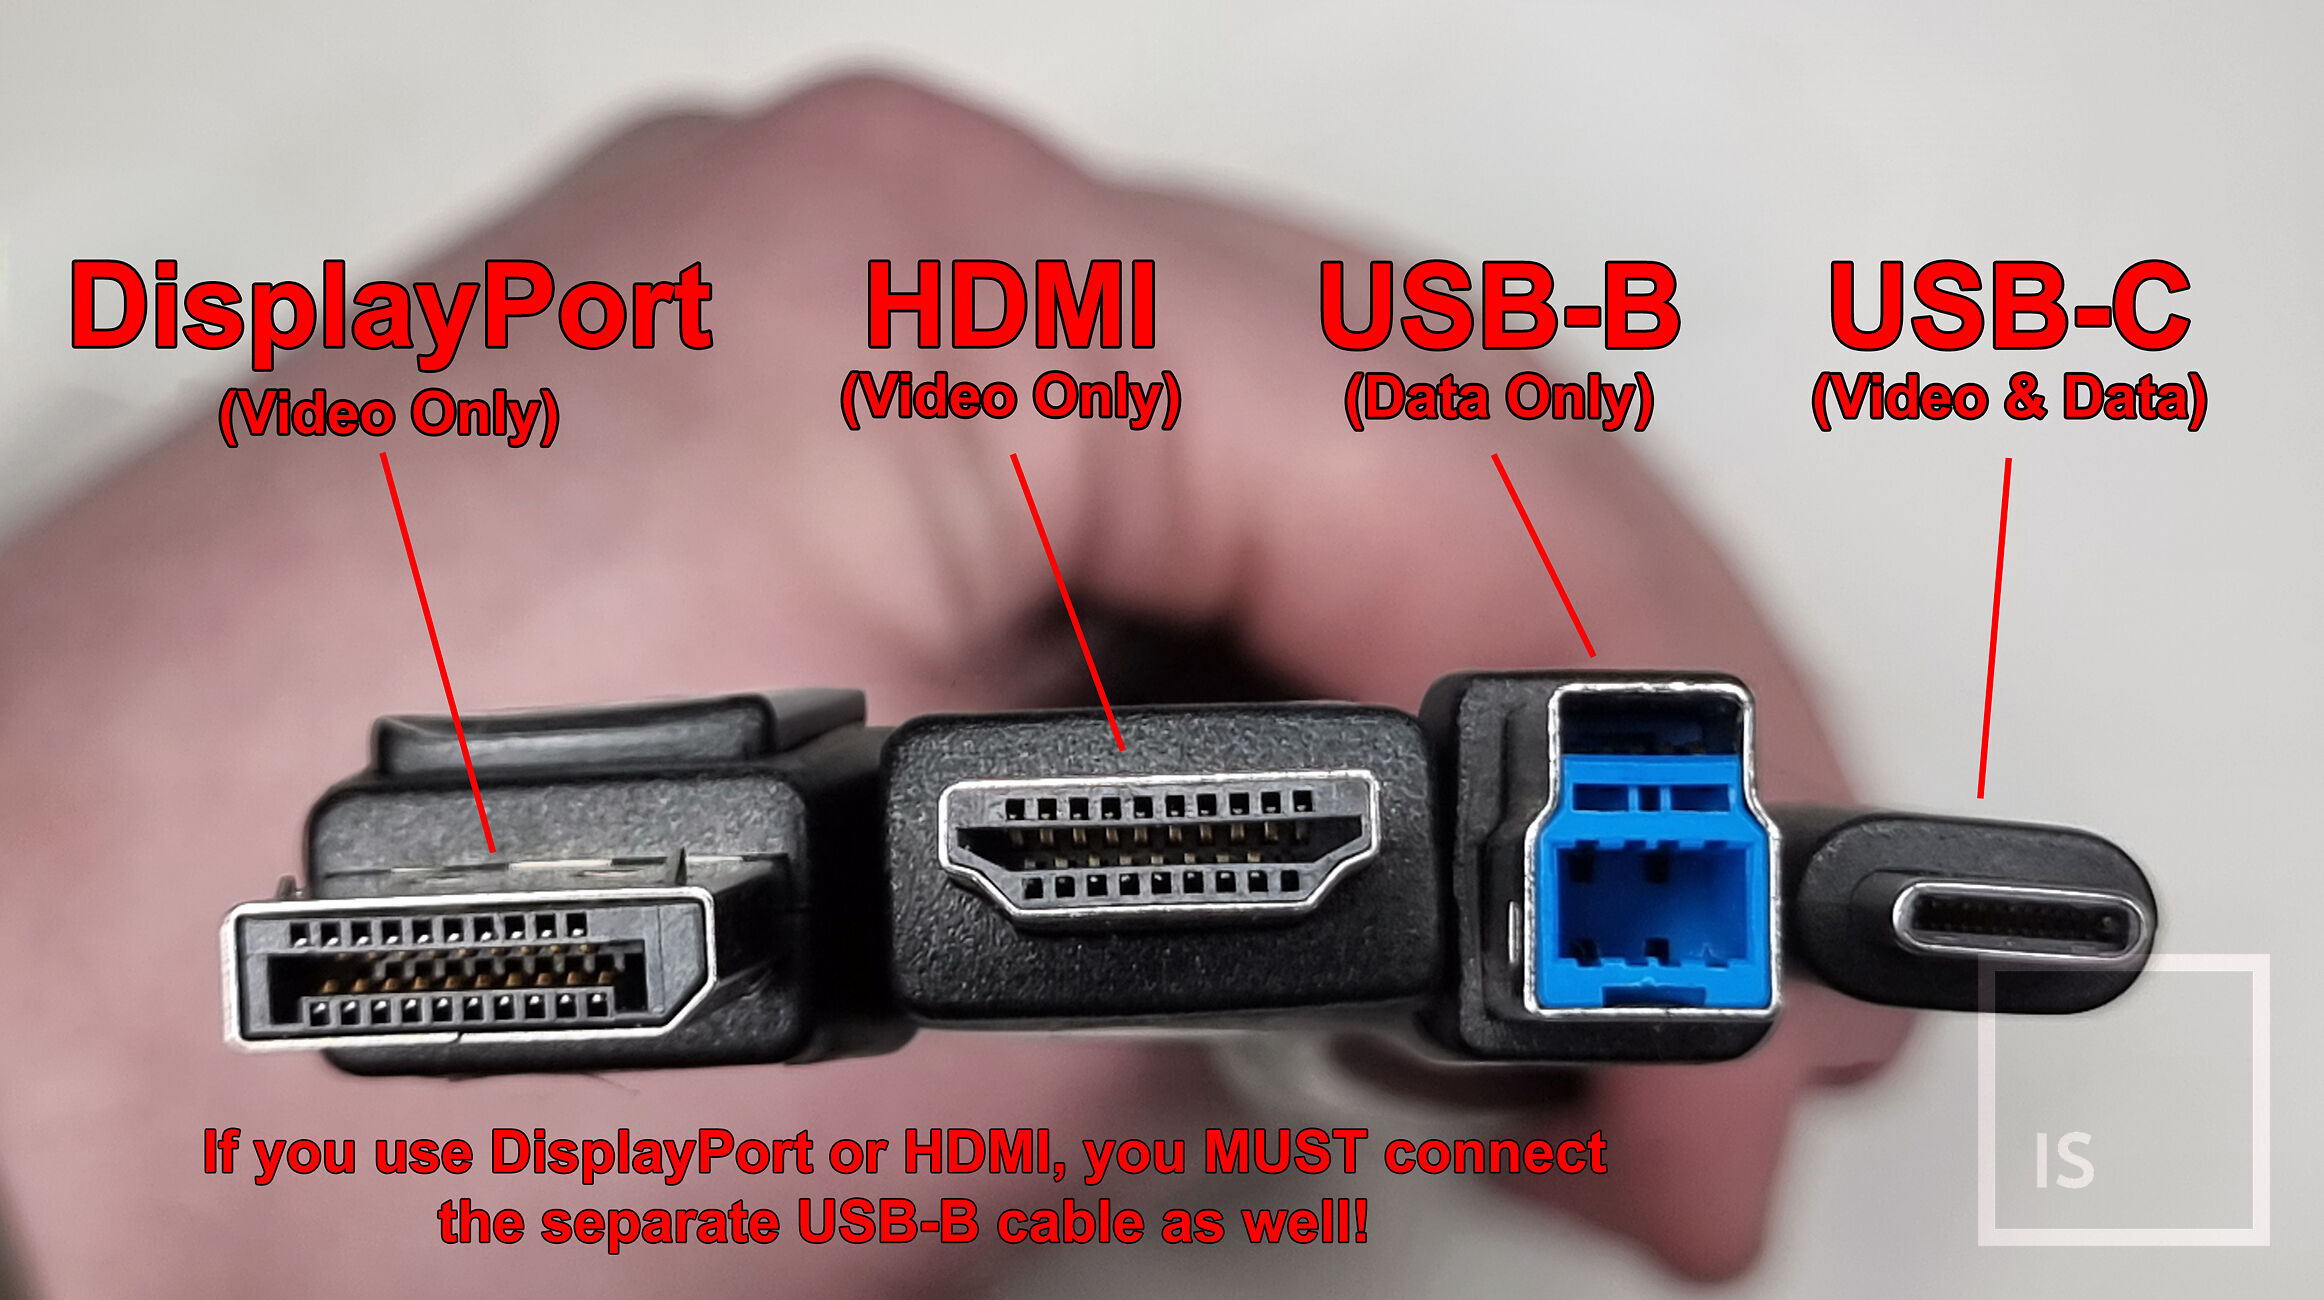
- Use USB-C to USB-C (or Thunderbolt) as the connection method by preference if your computer supports video over it, since not every USB-C port carries a video (DisplayPort Alt Mode) signal. Fall back to DisplayPort or HDMI only if you must. See About Monitor Connectors. Don't use an adaptor or hub.
- If you use DisplayPort or HDMI for video, you MUST also run the separate USB-B cable between monitor and computer. The screen needs a data connection as well as a video signal so the software can reach the panel's internals, and a missing USB-B cable is the most common monitor problem there is. This is not necessary if you are using USB-C to USB-C as the connection method. See How To Get The Right USB-C / Thunderbolt Cables For Your Monitor.
- Extend your desktop across two screens, never mirror, since mirroring can break proper colour management in some cases.
- The power socket on BenQ monitors is tight and needs a firm push to seat fully; intermittently dropping out or a crackle when you move the screen means it isn't all the way home.
Calibration
- If you are calibrating a direct hardware calibratable monitor (such as an Eizo CG/CS or a BenQ SW) then you MUST use Eizo's or BenQ software to do this correctly, and NOT Calibrite's or Datacolor's software.
- Factory 'calibration' only certifies the screen against standard gamuts, it doesn't tailor it to your work, so for accurate print output you still need to recalibrate it to your own target with an external colorimeter. See Hardware Calibration Targets.
- Recalibration isn't one-and-done, monitors drift over time. Most people should recalibrate about monthly, or every 200 hours of use, which is why buying a calibrator alongside the monitor makes the most sense.
- Install the right software, usually the latest version, so ColorNavigator 7 for Eizo and AQCOLOR Pilot for most BenQs. See How to Calibrate an Eizo ColorEdge Monitor Using ColorNavigator 7, and Calibrating BenQ Monitors with AQCOLOR Pilot (formerly Palette Master Ultimate).
- In AQCOLOR Pilot, you must scroll to the bottom of the licence agreement before it will let you continue. You must also sign up for an account in order to use the software. Also make sure to switch to advanced mode to get the full options and set a custom target rather than a basic preset.
- On an Eizo CG, turn scheduled self-calibration on yourself, since it isn't enabled out of the box. In ColorNavigator 7 > Monitor Settings > Management Policy, enable SelfCalibration on a usage-time schedule of 200 hours.
Symptom and solution
- No signal or a black screen means the monitor isn't getting a valid signal, so check the cable and that the computer is awake. BenQ monitors don't switch inputs automatically, so select the input you're actually using (USB-C, DisplayPort or HDMI) with the input button, and remember DisplayPort and HDMI also need the USB-B cable connected. Check too that your computer can drive the panel, as some laptops won't. See BenQ Monitors & Hooking Them Up.
- The software message 'Monitor not found' or 'Monitor not connected' usually means you are using DisplayPort/HDMI and do not have the separate USB-B cable connected. Make sure this USB-B cable is connected as well as the DisplayPort/HDMI cable.
- No signal from an Eizo after the computer wakes from sleep is usually fixed by enabling Compatibility Mode, in the monitor's hidden Administrator Settings menu. See the manual.
- A soft or blurry picture is the wrong resolution, so set the display to the screen's native resolution in Settings > System > Display on Windows, or System Settings > Displays on a Mac.
- Everything looking tiny on a 4K screen is scaling, not resolution, so raise the scaling (~150 percent is typical) in display settings. Almost nobody runs a 4K panel at 100 percent, since everything is too small to read.
- Calibration software that can't find the monitor or calibrator is usually a USB problem, which can be worse on Windows, so confirm the separate USB-B cable is connected as well (the number-one cause if using DisplayPort or HDMI), make sure to plug the calibrator straight into a rear computer port rather than any hub, extension or the monitor's own sockets, restart the computer with the calibrator unplugged and then plug it in, and don't let the machine sleep mid-calibration.
- A BenQ that used to calibrate and now fails on Windows is nearly always a recent update, so turn off Auto Colour Management under Settings > System > Display, without enabling "legacy display ICC colour management," and turn off HDR under Settings > System > Display > HDR. See BenQ Monitor Suddenly Failing Calibration?
Printer Troubleshooting
Tips and setup
Keep the printer clean and covered when it's idle, since paper and household dust are its main enemy, and use it regularly, since inkjets dislike sitting unused. The desktop P706 and P906 are happiest with a print or two a week, while the roll-fed P5360 really ideally wants near-daily use and turns temperamental if left for long. See How Often Do Inkjet Printers Need To Be Used To Be Happy?
Never clean the print head by hand or with household cleaners, so no Windex, no metho, nothing abrasive near the head. See OMG NEVER EVER USE WINDEX ON YOUR PRINT HEAD!!!
The one skill worth learning is the nozzle check, a small test pattern the printer prints on plain A4 to show whether every ink jet is firing. Run it before every printing session, then every 5 prints during, and whenever a print looks wrong, and if it shows gaps, run one head clean and check again. Don't clean repeatedly, since three cleans in a row is the ceiling for one sitting as the pressure from too many can damage the head. If gaps remain, rest the printer for a few hours or overnight, because the ink already in the head loosens a blockage on its own. if you have very stubborn clogs, then do a set of three cleans in a row in the morning, leave it powered on through the day, and do three more that night. Let it sit overnight, then repeat for 3 days. See Solving Inkjet Printer Issues.
See Epson P906 / P706 - Setup and Tips as a good starting point.
Setting up a new machine
- You MUST use the inks that come in the box with the printer for the initial charging. If you bought a full set of inks alongside your printer - do NOT use these initially. You MUST use the initial charging set of inks that came with the printer (or the printer will later refuse to load any inks).
- Let epson.sn (Epson's Setup Navi) walk you through installation, and don't plug the printer in until it tells you to. See Epson P906 / P706 - Setup and Tips.
- For the connection, use ethernet if you can, ideally with a fixed IP set in your router, then USB, and wi-fi only if neither is possible. See Checking USB Device Connections.
- On a Mac, make sure you are NOT using AirPrint, which strips out driver options and often prints drastically wrong colours. See Airprint Must Die!
Symptom and solution
- Faint white lines or streaks across a print are almost always blocked nozzles, so run a nozzle check and one head clean. See Solving Inkjet Printer Issues.
- Dark bands tend to be a paper feed problem rather than blocked nozzles, so leave cleaning alone and sort the feed instead.
- A washed-out, flat, stippled, or slightly green print can mean you're printing on the uncoated back side of the paper, so flip the sheet and reprint.
- A whole colour missing or wrong on the nozzle check usually means a failing or empty cartridge, or air in the line, not a clog, so fit a fresh cartridge of that colour before cleaning further.
- Marks or scuffs at the edges and corners are usually the head touching curled paper, so massage the curl out and widen the platen gap with the thick-paper setting, and load the sheet squarely. See Epson P Series Paper Loading Tips, Head Strikes and Blotch Issues on Inkjet Prints, Epson Printers and Thicker Papers, Living Life On The Edge - Issues With Borderless Printing, Paper Curl and Paper Feed Issues.
- Small random dots are loose dropped ink, often after a clean, and clear once you print a few light pages; a white speck is dust that sat on the sheet then fell off; a mark out in the border often lifts with a very soft eraser, or can be gently lifted out of the top layer of coating with the tip of a very sharp knife.
- Prints that stop partway through are usually a communication hiccup, so prefer a wired connection over wi-fi, try another USB cable, and restart if the queue or graphics card has jammed. See My Printer Is Only Printing Half My Print?!
- On a Mac, missing driver options or wrong colours mean you're on AirPrint or the basic driver, so remove the printer in System Settings > Printers & Scanners, install the current driver from epson.com.au, then add it again and choose the proper Epson driver rather than AirPrint. If it still won't behave, resetting the printing system clears everything as a last resort. See Airprint Must Die!
- Paper that won't feed or feeds crooked is down to curl or tired rollers, so de-curl the sheet by rolling it printable-side-out around a cardboard tube about 8cm across, restore lost grip with a rubber roller restorer, and for thick paper on the P706 or P906 use the front fine art path with clear space in front and behind. See Paper Curl and Paper Feed Issues.
- A printer that's sat unused and won't print cleanly needs patience, so run a maximum of three cleans and nozzle checks in a row, then leave it overnight and repeat rather than forcing it, since repeated cleaning under pressure is how heads die. Once it's clear, print plenty to get everything flowing again. See Solving Inkjet Printer Issues.
Also see Why Your Prints Are Too Dark and The Fundamental Differences of Screen to Print Comparisons.
Calibrator Troubleshooting
Tips and setup
If you are calibrating a direct hardware calibratable monitor (such as an Eizo CG/CS or a BenQ SW) then you MUST use Eizo's or BenQ software to do this, and NOT Calibrite's or Datacolor's software.
You should only use Calibrite's or Datacolor's software if you are attempting to (software) calibrate a non- hardware calibratable monitor. See Colour Control on Monitors and Calibrating Monitors with Calibrite Profiler.
Let both the screen and the device warm up before you start, keep stray light off the sensor, and make sure it sits flat against the panel with the counterweight holding it snug to the glass.
Two things catch people out:
- If you have an older X-Rite colorimeter from before the Calibrite changeover, it needs a small one-time fee to work with the current Calibrite PROFILER software. This affects the ColorMunki Display, i1Display Studio, i1Display Pro, i1Display Pro Plus, i1 Studio, ColorMunki Photo and ColorMunki Design. The fee is modest and tiered, roughly US$10 for some display colorimeters through to about US$70 for the all-in-one Studio, ColorMunki Photo and Design units. The alternative is to keep running the older X-Rite software on a compatible computer.
- Colorimeters don't last forever. The older Datacolor Spyder 3, 4 and 5 used organic dye filters that drift out of specification within a few years, often three or four, so a Spyder of that vintage can no longer be trusted. If you're still running one, moving to a current lens or dichroic-filter device such as a SpyderX2 or a Calibrite Display makes sense. The same ageing affects any colorimeter in the end, so a very old one of any brand is due for replacement.
Symptom and solution
- The software won't detect the calibrator, which is nearly always USB, so plug it straight into a rear computer port rather than a hub or extension, restart with it unplugged then plug it in, and don't let the machine sleep. The monitor connecting tips above go into more detail. See Checking USB Device Connections.
- An older X-Rite device the software refuses to use needs the one-time upgrade fee above, or the older X-Rite software on a compatible machine.
- Calibration runs fine but colours still look wrong, or two screens won't match, which points to an ageing sensor (especially an old dye-filter Spyder), stray light, or the wrong display type chosen in the software, so calibrate in a darkened room, set the correct panel type, and suspect drift if the device is old.
- The profile looks right just after calibrating but reverts at the next login, which is the software's profile loader failing to start, so reinstall or re-enable it and check it's set to load at startup.
Palette Cube & Pico Troubleshooting
Tips and setup
The Palette Cube and Pico are solid-state devices with no moving parts, and they leave the factory tested, so genuine faults are rare. App problems in particular are best taken straight to Palette at [email protected].
Symptom and solution
- The Cube's touch-sensitive power button won't respond, so power-cycle it by switching it off, waiting ten seconds, and switching it back on, which resets the touch sensor. If that doesn't do it, cover the whole textured top of the Cube with your hand for about five seconds to force the power cycle. See Troubleshooting the Palette Cube/Pico for more info.
- Readings look inaccurate, which is very rarely the device itself, so first check how you're measuring. Hold it completely flat and still against the surface, and don't judge it against colours on a phone or an uncalibrated screen, since those aren't colour-accurate and the whole point of the Palette is to give you numbers you can trust instead. Test it on plain paper or a wall, and against a known reference such as a paint sample card or a Pantone chip. If readings are grossly wrong, a blue wall reading as pink, or they jump around on repeat measurements, that is worth taking up with Palette Support at [email protected].