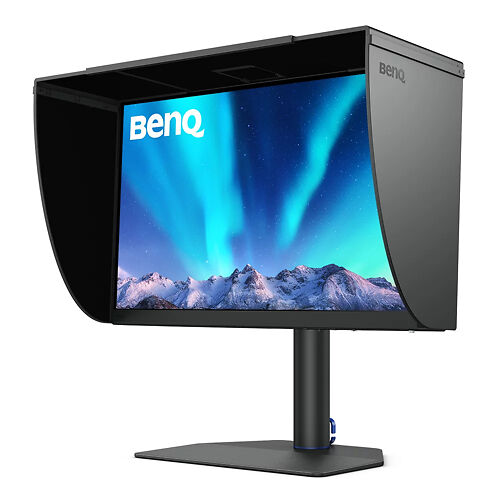
BenQ SW272U 27" 4K Monitor
BenQ's new flagship 27" colour accurate 4K (UHD) monitor.
▪ Free Courier Shipping to most locations! (See notes).Please note that we are open by appointment only (except for click and collect pickups once notified ready).
In Mid 2023, BenQ released new calibration software alongside their forthcoming new flagship monitor models - the BenQ SW272U and BenQ SW272Q.
Those new monitors look like a huge leap forward for BenQ (and we'll have evaluations of them soon of course!).
However, perhaps even more importantly, this new calibration software is a really a giant leap into the future for BenQ.
Developed in-house by BenQ, it is a truly massive improvement over the previous software efforts (Palette Master and Palette Master Elements - both developed externally to BenQ by industry partners).
Credit where it is due - they have pretty much nailed it this time - I honestly think they have pretty much leap-frogged into the number one position for calibration software. Even better, this new software is compatible with a bunch of older models too!
Read on for our evaluation of, and comprehensive guide to, this very exciting new software.
NOTE: In April 2026, BenQ rebranded 'Palette Master Ultimate' to 'AQCOLOR Pilot'.
It is functionally identical, but the guide below still refers to it is PMU.
AQCOLOR Pilot is available for download here.
Since their entry into the colour accurate monitor market, in 2013 (10 years now!) - BenQ colour accurate monitors have had impressive hardware - offering performance close to the best options available, but at a very competitive price. These monitors offer support for Direct Hardware Calibration.
Unfortunately, BenQ's software game has not quite lived up to their hardware game. Palette Master, for the P/PV line of monitors, was a re-branded version of X-Rite's calibration software. It worked well, albeit with the notoriously quirky UI of that software. But BenQ soon changed tack with their hardware, releasing the SW line of monitors, and with that the completely different Palette Master Elements. This was software that was....hard to love. It was unattractive, and over the years suffered from regular issues with significant bugs.
All in all, the software side of BenQ monitors was a real let-down next to the hardware, and are area of I have been consistently critical of in our many BenQ monitor evaluations.
Enter, Palette Master Ultimate. (We'll often refer to it as PMU to save some typing!).
New in mid 2023, this software marks a new beginning for BenQ - catapulting them from last place, in software terms, right up to the top of the pile. It's truly a great leap forward and addresses and solves just about all the issues I've ever had with the BenQ colour accurate monitor experience.
Combined with the new hardware, I think we're on the precipice of a new era for BenQ - one where they can finally truly compete on the same playing field as Eizo. We'll know for sure once we've had a chance to really try out the new hardware, but even with existing BenQ monitors, the new software brings really massive improvements in all key areas - ease of use, performance, and speed.
It's also clear the Palette Master Ultimate - which is already feature complete for most home and small studio users - is also a platform on which BenQ plans to build in the future - with more advanced features in the pipeline (e.g. one imagines cloud based configuration management will soon come - a Godsend for larger studios in keeping thing consistent, and big advantage of Eizo's very well establish ColorNavigator software).
But for the core feature of monitor calibration - Palette Master is, already, in a word - superb. (Well done, BenQ!).

BenQ have very wisely not limited this software to only their latest models.
Palette Master Ultimate is compatible with most recent BenQ models, spanning back several years now:
Sadly the noticeably older SW320 and SW271 models are not compatible, but those are getting quite long in the tooth now, and you can of course continue to use Palette Master Elements.
Palette Master Ultimate works with all the 'usual suspects' in the sensor world:
In general, BenQ have made it possible for just about any modern sensor to be used, so we can expect that any new sensors that might appear, from the major brands (Calibrite and DataColor) - will be supported.
Note that as ever, the base level calibrator models (e.g. the i1Display, without the Pro label) - are not compatible, and will never be compatible, with any after-market software like this. This is why we persistently recommend to people that buying these 'cheaper' sensors will usually end up costing you more!
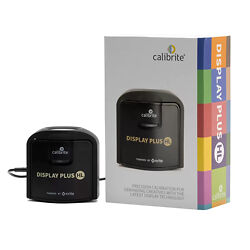
For all of the current BenQ monitor range, the best price/performance can be found in our perennial recommendation, the Calibrite Display Plus HL.
As ever, before you calibrate your monitor, you should understand what it is you're actually about to do, and carefully follow our guide to get your system ready for calibration.
Please, DO NOT skip this step!
Just about every support call we get about calibration stems from people not following these recommendations.
Click below to read our guide and come back only when you're finished:
If you have a compatible BenQ monitor and sensor, then of course BenQ Palette Master Ultimate is free to use!
Download the latest version from here, and install it like you would any other application.
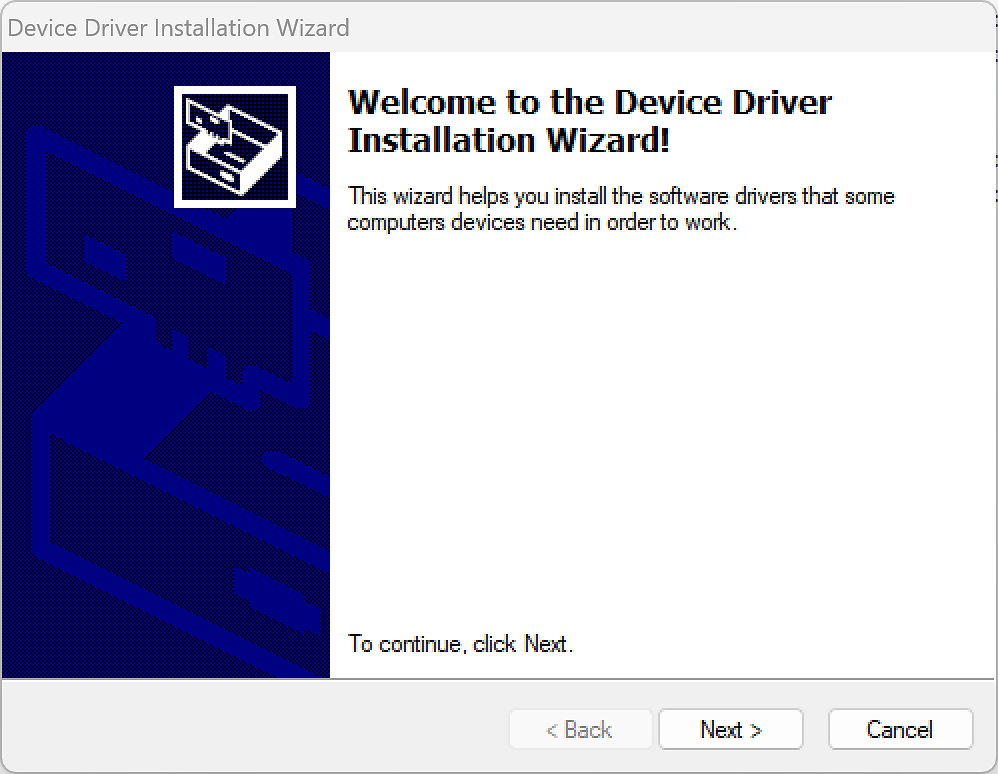
During the install, PMU will also set up appropriate drivers - for both the monitor (the USB data connection that PMU uses to communicate with these monitors) - and the compatible sensors (which means, if you are only using your sensor with your BenQ monitor, you don't even need to - and to keep things simple, shouldn't - install the software that comes with your sensor at all. PMU will take care of it all for you.
As such, and depending on your platform, you may see some extra stages during your installation as these independent things are installed. E.g. you may see the FTDI drivers - which are actually the USB drivers.
Just keep clicking install/next until everything complete.
Congratulations - you've now got Palette Master Ultimate installed!

As someone who has supported literally tens of thousands of people doing monitor calibration across more than 20 years, I am, more than most, painfully aware that supporting calibration can be difficult.
There are just so many variables involved with people's systems - this makes it very hard. (Far fewer variables, though, if you have properly and completely followed our guide to preparing your system for calibration!)
BenQ have also sought to tackle this problem by building support directly into PMU in various ways.
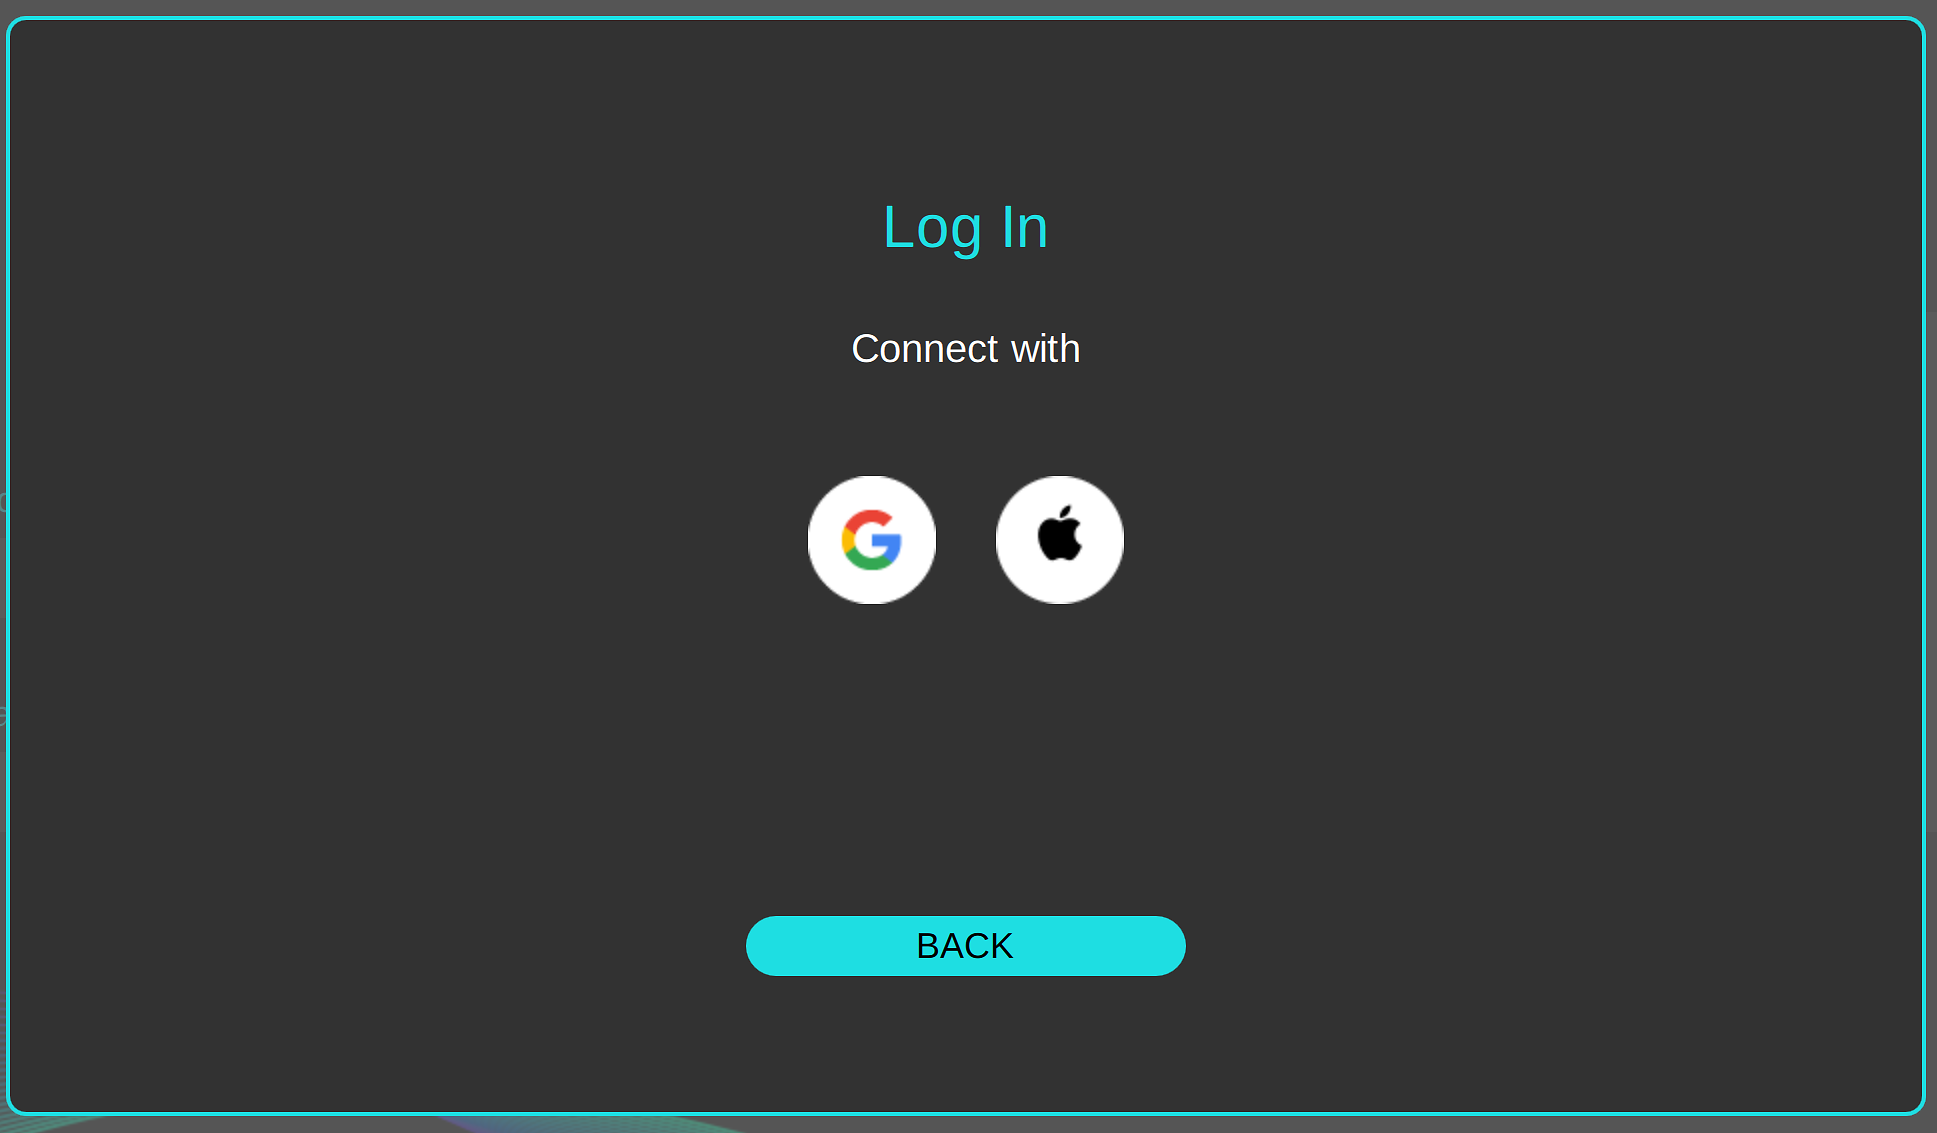
The first of these is that PMU requires a login to work - and this is really the only thing I definitely DON'T like about PMU. The goal is to support things like submitting support requests directly to BenQ (and other features will be coming later that take advantage of having a login, too, of course.
You get 30 days to try the software out without one, but after that, as it currently stands, you must register to continue using the software. I have strongly encouraged BenQ to change this. For many large companies, this is not an ideal scenario - whose login to use? What happens if that person then leaves the company? What about privacy concerns - especially in Europe with their progressive GDPR privacy law.
Worse - at the moment, you can only use a Google or Apple login to register PMU - there's no option for a direct email based account. A lot of people specifically don't like those 'Uber companies', and do whatever they can to avoid being tied to them.
In all honestly, BenQ will almost certainly be forced to re-think this part of PMU, and I really hope they do. Whilst it's not really that big of a deal in practise for most, for some it will definitely be a deal-breaker. And it would be a great shame to miss out on PMU just for this reason!
For now, register and log in, we must. I went with Google and it was the usual 'off to browser and phone for 2FA process'. Not hard, but definitely should NOT be a requirement. Following this, there's one of those annoying 'Terms and Conditions' screens - the type where you have to scroll to the bottom of the info in a vain attempt to make you actually read this information - before you can sell your soul to the devil (i.e. tick the box and move on).
The afore-mentioned log-in system covers calling for help (or, as ever, if you're an Image Science customer, you're welcome to call on us directly for support at any time, for the entire lifetime of the products you've bought!).
But it's also worth noting that BenQ have also produced a really good user manual for Palette Master Ultimate. You can get that here. Compared to most of the manuals for colour management software that are either non-existent, or basically are unintelligible as written by and for boffins - this manual is a commendably simple yet thorough guide to the software, and well worth your time.
Palette Master Ultimate also has a nice and clear built in upgrades system and will prompt you when a new version is available.
This triggers a re-install (your settings are all saved of course), and is very simple.

Now that we have Palette Master Ultimate installed, and you've prepared your system for calibration - fire PMU up and you will be greeted by the excellently designed user interface.
It's modern, attractive, works properly on both older and modern 4k screens, and everything is where you'd expect it to be. It is, quite simply, the best UI for monitor calibration I've seen to date. (The challenge will be for BenQ to keep it this good as they add new, more powerful features over time!).
Aside - to be honest, it's a mystery to me why calibration software is generally so awful - whether it's just completely non-standard approaches to UI design (e.g. i1 & ccProfiler), or just far too complex for most people who just want to get on with the basics (Eizo ColorNavigator) - for more than 20 years now, all of these things have had pretty awful user interfaces. Even the new Calibrite Profiler, also release in 2023, is pretty far from ideal!)
It's a minor thing - and you would think others would at some point have got this right - but even the graphics and icons BenQ have chosen make good visual sense - after 20 years of dealing with bizarre butterflies, chameleons and whatnot, it's nice just to have a decent looking logo.
Note there is also a corresponding tray application, as usual - which can be used to e.g. control the calibration reminders and start the software. On the PC, in you tray, usually bottom right, and on the Mac, in the top right menu area, by default.
The first screen you'll see is the Device Selection screen.
Here, you choose the monitor you have connected (if the software can't find your monitor here, go back to our Getting Prepared For Monitor Calibration Guide and read the USB stuff again!).
You also choose the calibrator you've got here (and there's a little arrow symbol to click if you want to force the software to re-attempt connection - e.g. if you've just plugged in your calibrator after starting the software.
(There are notes in the BenQ manual for some special scenarios, like e.g. multiple monitors on M1 Macs, and indeed multiple monitor scenarios in general).
Once your devices have been chosen, look to the right of the screen and you can see the three core activities the software offers (and most users will only use one of these, most of the time).
For general purpose calibration, and in most normal usage scenarios, you'll just use the first option - Colour Calibration - and this will actually perform validation automatically as part of the process.
You can, optionally, also do more advanced colour adjustment- this is BenQ's version of Eizo's Advanced Adjustment - and is especially useful for really tweaking things further when e.g. setting up for very precise soft proofing to a specific paper type.

Moving on to the next step, we enter the main calibration stage.
As ever with monitor calibration, we most first choose or define a calibration target - i.e. the settings we want to calibrate the monitor's display to match.
Once that is done, we move on to the actual measurement and calibration stage.
Again, this screen is just very clear and excellently designed - with your key target settings on immediate show, and a nice clear 'Edit Target' option.

At the core of calibration is defining your calibration target. We have a whole separate article with advice on suggested calibration targets for different scenarios.
PMU includes a number of standard based presets - e.g. for Rec.709 general HD video editing, or a Photography preset for editing for screen based work.
These presets are useful; a good starting point if you don't have specific needs or the knowledge to make your own target - however in practise you can often calibrate more effectively by defining your own target.
There is also the option to match another monitor - e.g. if you're calibrating a secondary SW monitor alongside your primary display. (I believe you can even measure a non SW monitor here, but it raises a warning about this, and it's unlikely to produce good results).
Let's look at the Palette Master Ultimate system for defining targets (accessible via 'Edit Target', and some thoughts on the options available.
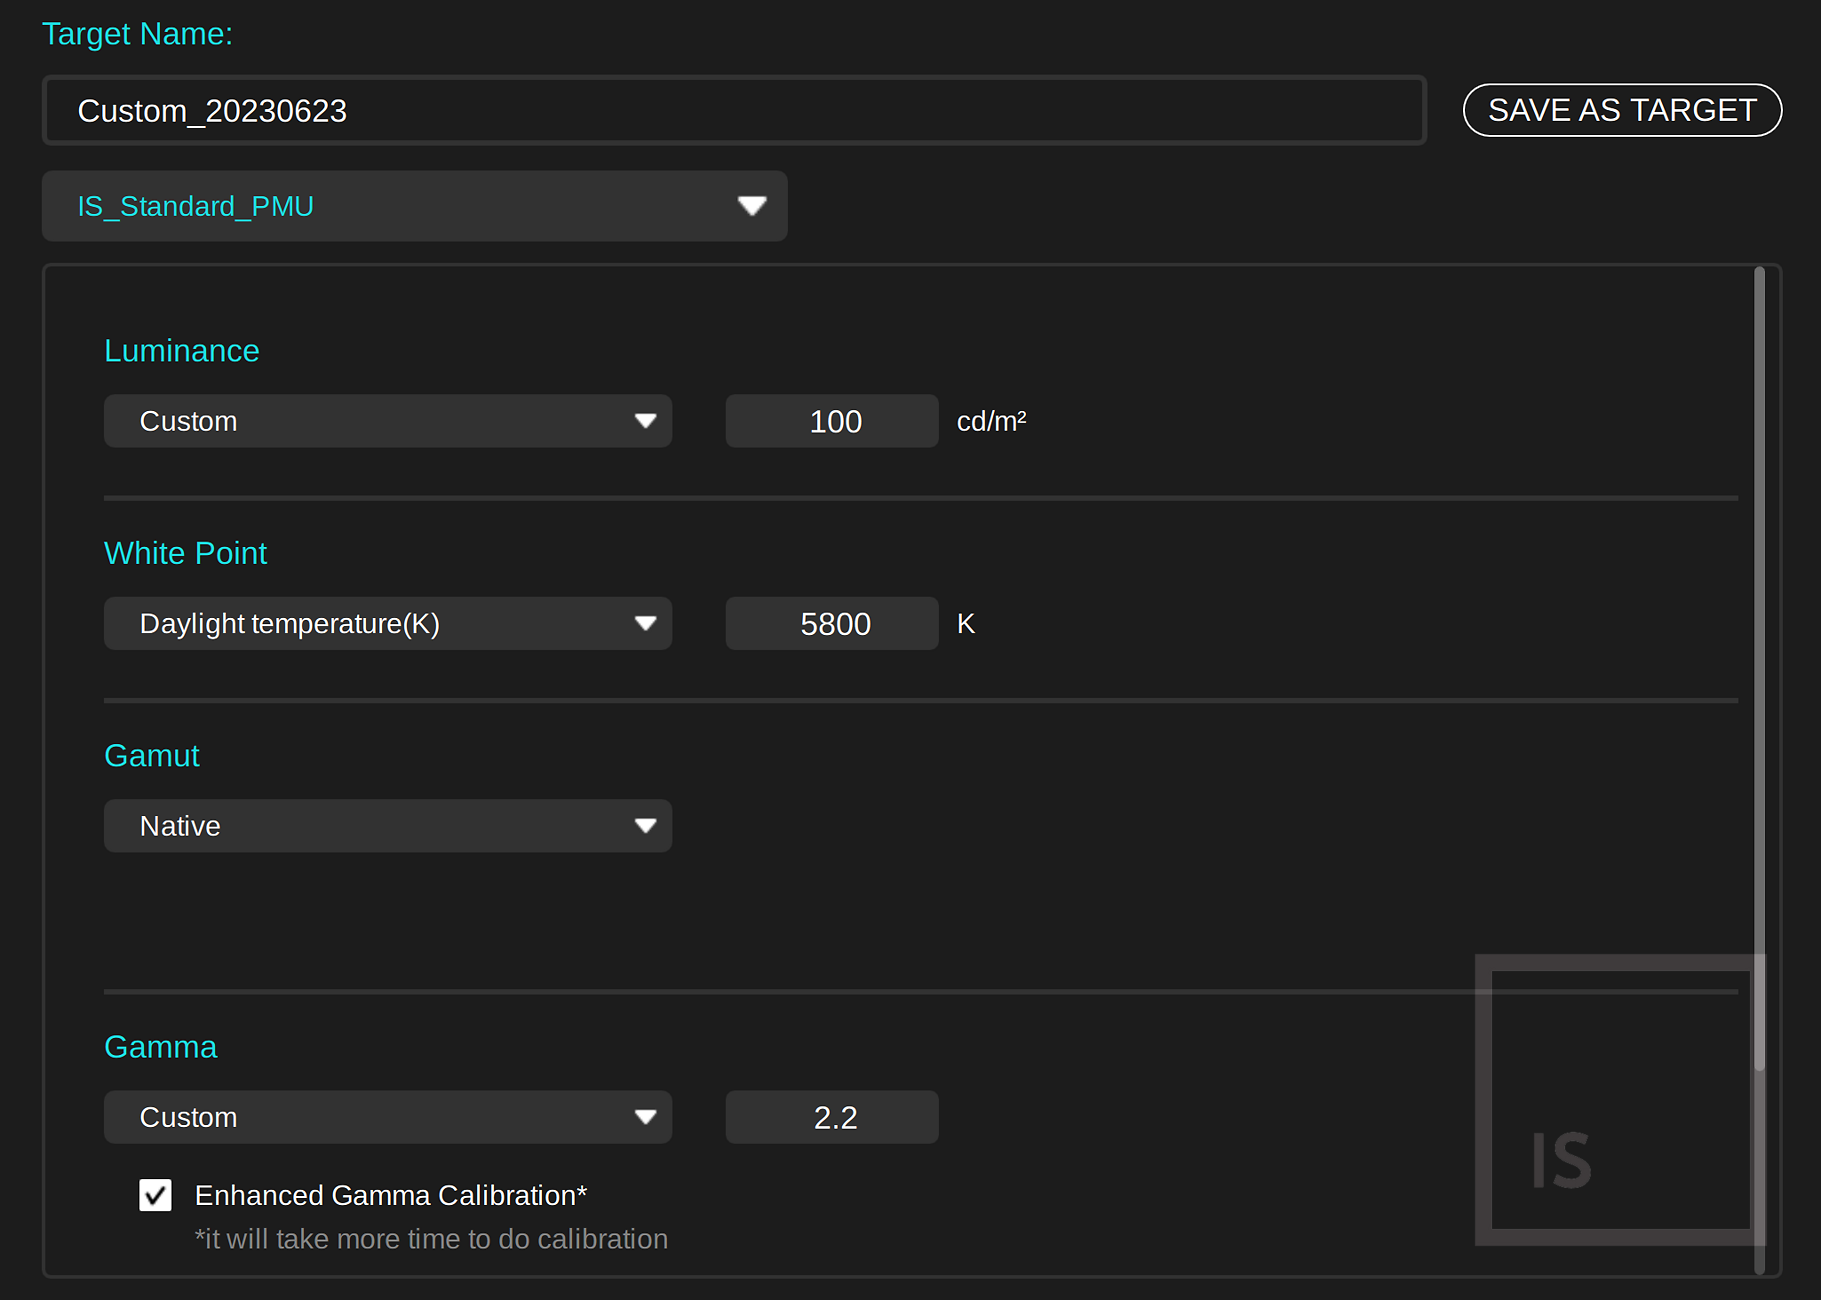
Name
At the top is the name for your target, that will later appear in the target list. A good name will make your calibration much more useful, as you'll know when you intended to use that calibration - something that combines context and key settings like 'Fine Art Print - 5800K-100-0.4-2.2' is generally a sensible idea.
Luminance (i.e. brightness of white)
Most people working with images will typically set this to a value in the 80 to 120 cd/m2 range. E.g. at Image Science, we use 90 cd/m2, for excellent screen to print matching. This figure depends on your ambient lighting, so there's no one correct value we can give you. If your lighting is brighter, you'll likely want a higher figure, and lower for lower therefore.
For most, 100 cd/m2 is a good starting point. But you will likely want to change this figure iteratively as your experience grows - e.g. if you're finding your prints (on a profiled, accurate printer) - are consistently are 'too dark' - then actually your monitor is too bright - so re-calibrate to a lower value here.
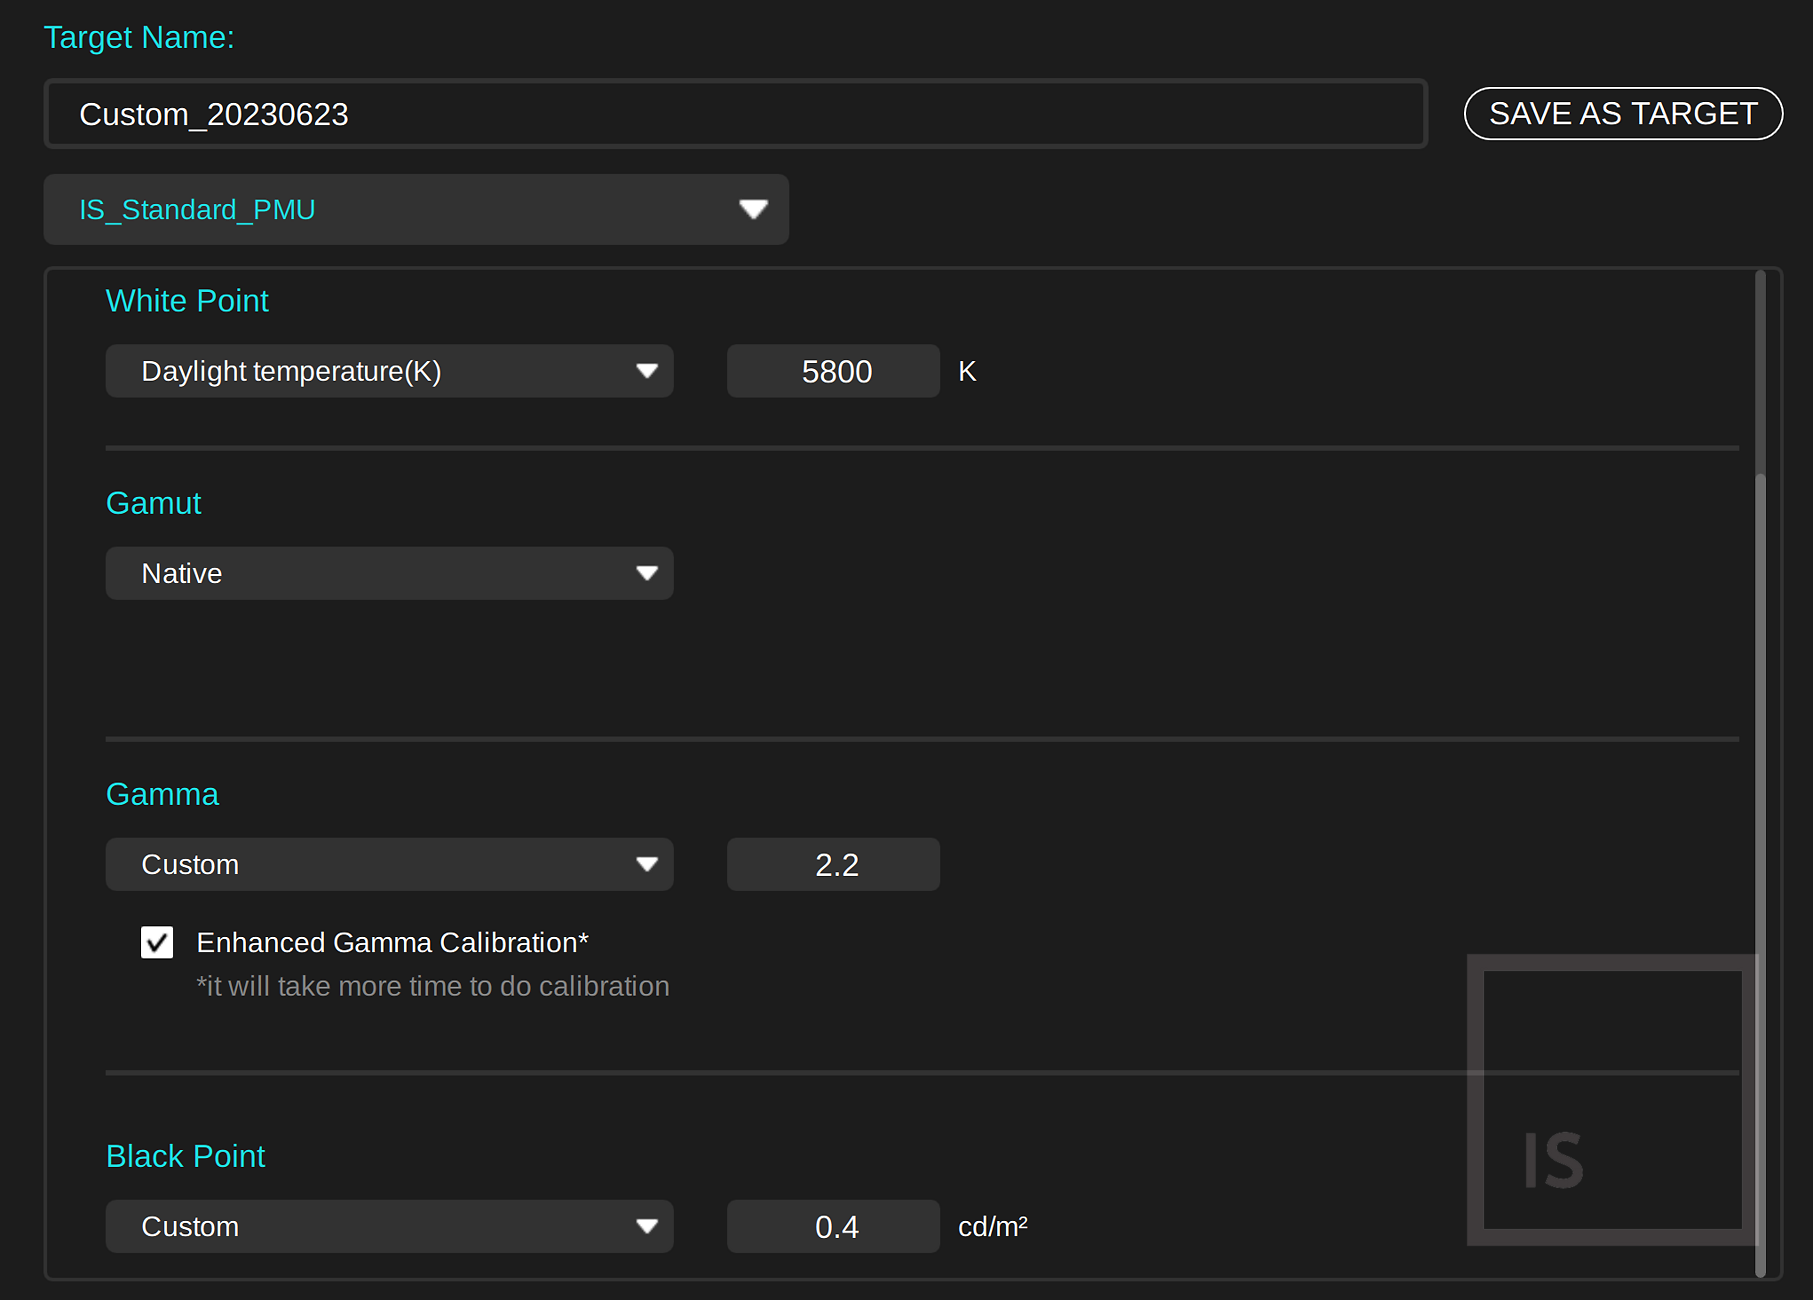
White Point (colour of white)
If you do mainly screen based work, or work with classic photo labs, you'll likely choose the 'industry standard' D65/6500K here. If you mainly do fine art printing, you'll find the de-facto standard 5800K a better (slightly warmer) whitepoint to work at.
For video work, you might choose D65 for HD Rec.709 work, or P3 for modern UHD work.
Gamut
The native option here means use all of the screens available colours (approximately AdobeRGB with BenQ SW monitors). This is suitable for most scenarios (remember, you can of course still work on files in smaller gamuts and they will be displayed accurately in your imaging software)- this is just defining the maximum gamut the calibration will allow).
If you really want to limit things at the calibration stage (e.g. your using non colour managed applications) - you can apply a 'physical' limit to the gamut here - like e.g. sRGB or P3.
Gamma
For almost everyone, almost all of the time, you'll want this set to 2.2
If you know why, L* is available, as is matching another monitor's measured gamut.
Black Point
For simply the blackest blacks (and somewhat reduced shadow accuracy) - choose Absolute Zero (e.g. for video editing, or for work destined for screens, this is typically the sensible option.
For print work, though, we want to reduce our screen contrast significantly, because screens have far more contrast than paper. Contrast ratio is white dividided by black, so e.g. with 100 cd/m2 for the luminance, a black point of 0.5 is 100/0.5 - or put another way, a 200:1 contrast ratio. Typically a figure of around 200:1 works well for print editing.
Once you're done, save your target and from now on you'll be able to choose this from the list of targets (and if you want to later delete one, it's as simple as using the X to the right of the target name in the target menu - no mess, no fuss!).
The last thing to note before we move on to measurement is the 'Calibration Mode' selection. This is not well named, to my mind - a better name would be 'Hardware Calibration Mode' (or 'slot' perhaps?).
BenQ SW monitors typically have 3 available hardware calibration slots. Each of these slots stores the settings and adjustments for a calibration in the monitor's hardware. Once these are set up, and you complete the calibration process for each mode/slot, you can then easily change between your hardware calibration modes using e.g. the Hotkey Puck that comes with your monitor (or the monitor menus of course).
Eizo monitors usually now have 10 of these slots, and advanced users do tend to use more than 3 (e.g. if they work in both video and photo) - so it would be good to see more slots in future monitors. And/or an easy system to swap between calibrations in these slots - i.e. load up other pre-existing calibrations without having to go through the while calibration process again.

Once we've chosen/specified the target for calibration and the calibration mode (slot) we're going to load with this calibration, the next stage is measuring and adjustment.
Of course, as this is a Direct Hardware Calibration monitor, this is just a super easy process of putting the calibrator on the screen and hitting 'Go'. There's no mucking about with manual monitor controls here, and thus no real chance for making mistakes in this stage.
BenQ gives useful advice here, such as letting the monitor warm up - monitors stabilise over time, so it's best to calibrate them when they've been on for a little while. BenQ mention using the USB-C or DisplayPort connection options - always better than HDMI, if you the option, as occasionally HDMI connections can result in video levels issues and thus failed calibrations.
All of this, and more, is of course covered in more detail in our Prepare For Monitor Calibration & Calibration Goals article.

Follow the instructions to place your calibrator on screen, and move on to the actual measurement stage.

A long standing criticism to BenQ monitors has been a general sluggishness - slow to wake up from sleep, and really quite slow to calibrate (20 minutes plus, sometimes 30 or more!). This is an area that e.g. Eizo has been leagues ahead in, with calibrations their taking only about 5 minutes.
BenQ have solved a lot of that problem with Palette Master Ultimate - it's much quicker, even with existing models like our SW321C (just over ~12 minutes for ours for calibration and validation). And apparently, the new models are about half that time again, circa 5 or 6 minutes for a full calibration and validation, which is excellent, and on par with Eizo. This, of course, means people will calibrate more frequently and be less annoyed by the process - a very good thing.
Not only is Palette Master Ultimate much quicker, but it's also much more accurate.
A figure known as 'deltaE' measures the observable difference between colours, with a result of 1 or below being regarded as imperceptible, and 1 to 3 very close. Typically, with BenQ's previous software, we saw average deltaE figures around the 1 mark - sometimes below, sometimes a bit over. Good results...
...however, with PMU and on the same monitors (let alone the new improved models!) - the results are much improved again - we're seeing average deltaEs distinctly below 0.5 - and maximums below 1.0 - which is just superb, and a reflection of the quality the underlying hardware has always had.
Both faster and more accurate is a real triumph of engineering - and shows the effectiveness, advantage, and indeed necessity of, doing this sort of work in-house.
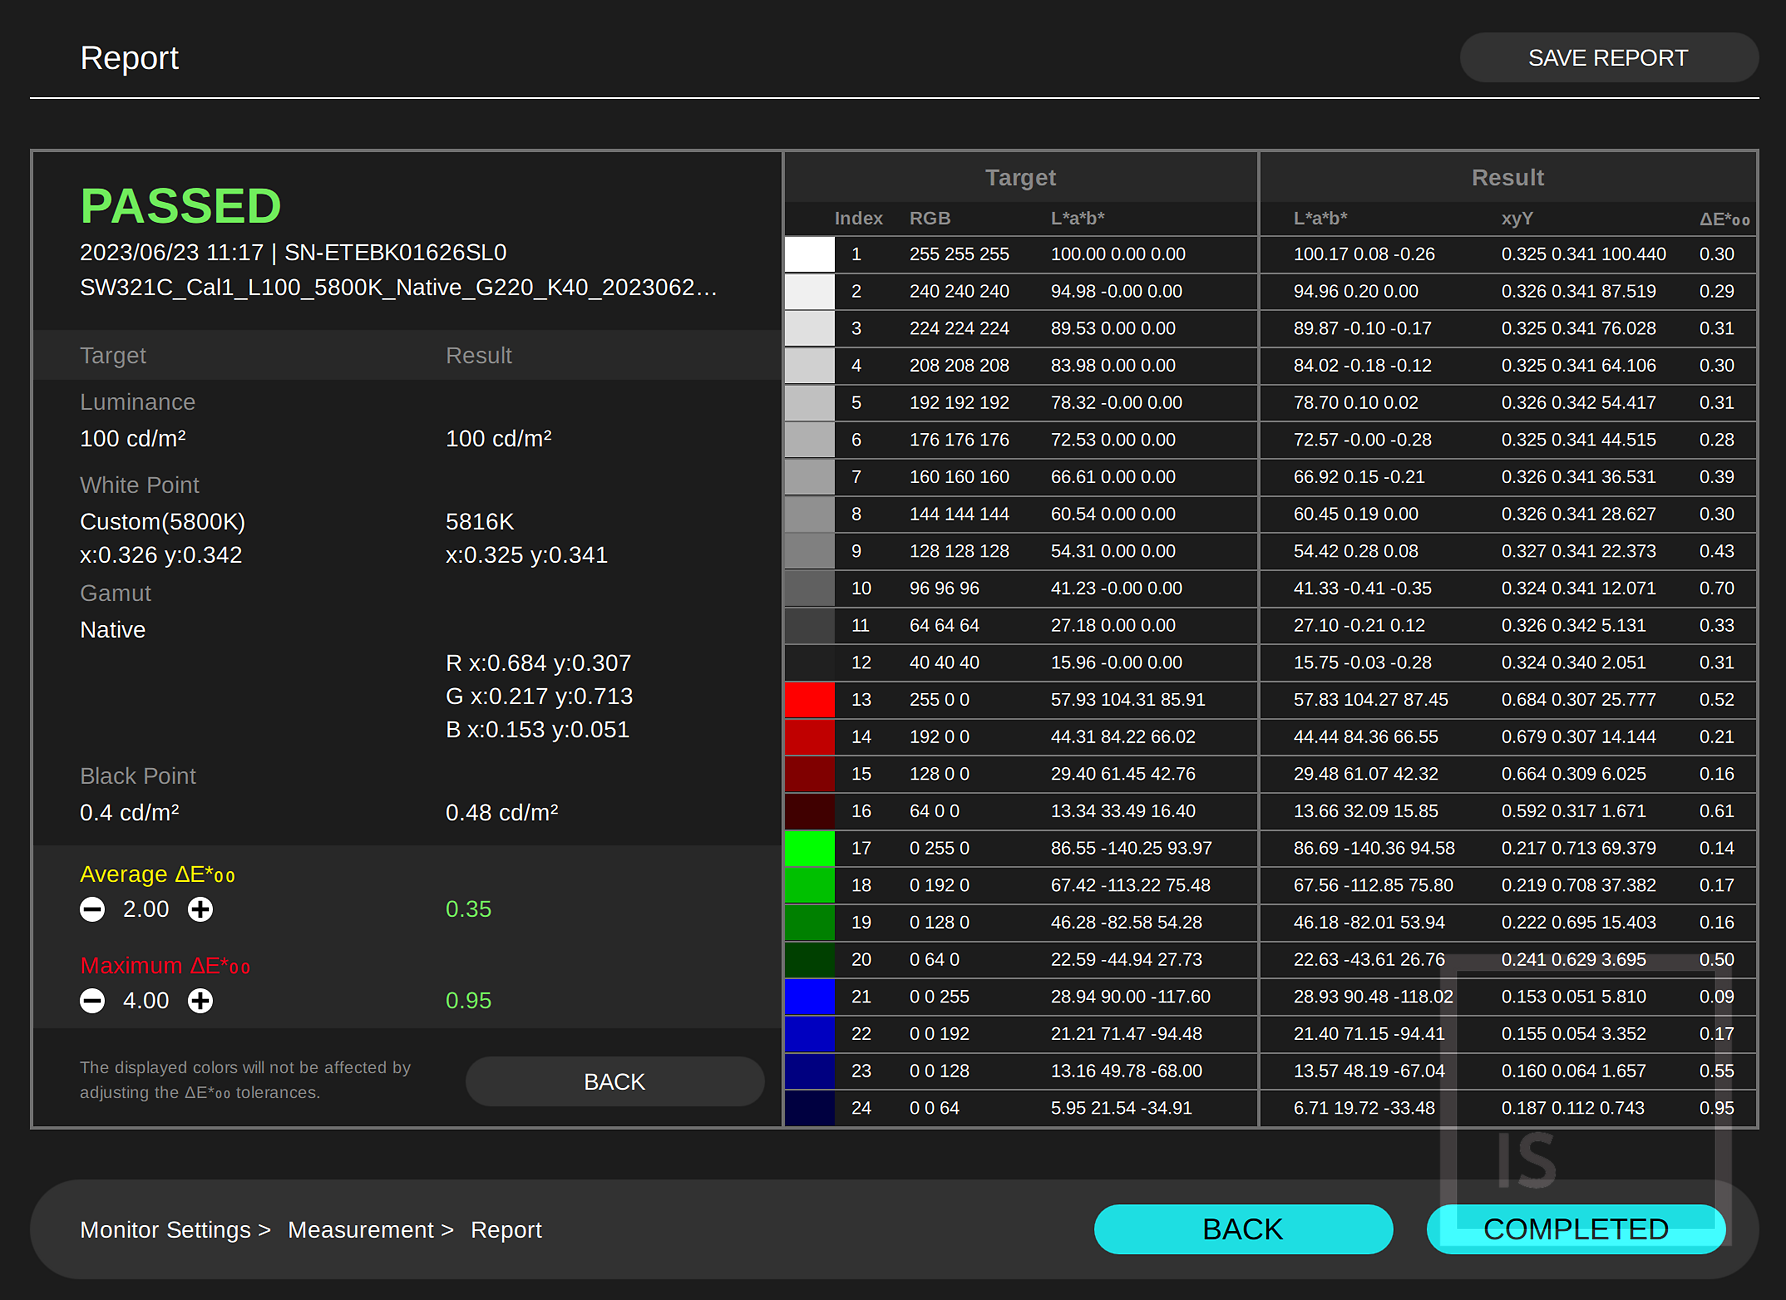
When calibration and validation completes, you'll get a nice visual report (with a 'Before Calibration' and 'After Calibration' view, toggle-able by the icon bottom right). You can also load your own images for comparison at this point, if you prefer.
(Note - you won't see the differences in these screenshots, of course!)


More importantly, you also get a statistical report (downloadable as a PDF - here's an example).
This shows the average and maximum deltaE figures - and you can even define those figures if you want to set tighter parameters!
You're done!
Your monitor is calibrated, and the results validated.
For most people, it's time to get on with using and enjoying your calibrated screen.
If you want to go a a step further - e.g. to refine your print soft proofing to the highest level, you'll want to look at the Advanced Colour Adjustment option.
We'll have a guide to that soon, too - and will post the link here once available.
Palette Master Ultimate is excellent - unhesitatingly recommended to all current and future BenQ owners with a compatible monitor and sensor. Download it now!
It's frankly so much better than Palette Master / Elements that it's almost hard to believe it's true - you'll want to leave those older packages in the dust as soon as you possibly can.
At the moment it's already superbly good at the core task of calibrating one or multiple BenQ SW monitors, to a level of quality to suit all but the most demanding users. It does this whilst maintaining simplicity and ease of use - much more so than e.g. Eizo's overly complicated ColorNavigator - which is great once you know how to use it, but hard to get going with, and the ColorNavigator UI is generally cluttered and confusing.
And, BenQ promise new features will be added in due course - presumably cloud based features like tracking behaviour over time, co-ordination of settings across installations, support ticket handling and son on. I'm just guessing here, but these all seem like things that are likely to be offered in the future.
The future for BenQ looks bright indeed.
Of course, nothing is perfect! But PMU comes about as close as one could hope for a version 1 software product.
Here's a list of things I hope to see come to PMU in the future:
Two exciting new BenQ models have arrived. As usual we have comprehensive evaluations of these models.