Tips on Creating Artworks Specifically for Scanning
These days, a lot of original artworks are created expressly to be reproduced into digital form.
Here a few example scenarios:
- You paint, but most of your sales come from print reproductions, rather than the sale of your originals (this is increasingly true for most artists...)
- You're making patterns for fabric or wallpaper repeat purposes
- Your work is an interim part of your process - you create by hand but assemble elements digitally
- You create artworks by hand but then do further work on top of prints of the artwork (e.g. foiling etc)
- (Honestly, there are hundreds of such scenarios...)
In all the scenarios, a fundamental part of the quality of your final results will rest on the quality of the digital capture stage, when your by hand work is turned into digital pixels.
Don't Do It Yourself!
Probably the single most important step you can take to increase the quality of your results at that stage is to recognise that using a service like ours always results in much higher quality results than attempting to take this stage on yourself (and we've got a whole articles explaining why, see below).
The goal is to capture your works once, into the highest possible quality digital version, so that you have a digital asset you can use for the rest of your career as an artist. Skimping on this process, or using poor quality equipment and poor technique, is a massive mistake that can materially affect your ability to make a good income as an artist.
It really is worth doing this in the best way possible, as this one step is absolutely the key thing you can do to open up future possibilities with the works you create.
Professional artists should have all their originals captured, to the best quality possible, as a fundamental part of the art creation workflow.

Other Key Improvements
Other than not doing it yourself, what else can you, as a artist, do to increase the quality of your results?
As it turns out, there's quite a few things you can do to make this stage easier and more effective.
Scanning > Phototgraphy: Use maximum of A2
As per the article linked above, scanning is usually the best approach for capturing artwork - photography can be very useful, of course (particularly for large pieces or those with significant texture, but see below for why texture is best avoided in this context).
In general, if you can instead scan a work, you should scan a work, for the best results. There's a lot more about this in the article above.
Scanners do have one significant limit, though - which is the size of their scanning bed. The first things to understand is that whilst there are 'plan scanners' (machines that look like giant laminators) - these are NOT suitable for artwork scanning - they touch the surface of your artworks (bad!) - and they are also built for scanning speed, not quality, and do not give high quality results with artworks. They are designed for scanning simple things like CAD/CAM linework (i.e. plans), and not artworks, where quality just isn't a big concern.
Our machine is, in contrast, custom designed to be an artwork reproduction scanner - your original is not squeezed through a slit, so is safe through the entire process, and the optics and sensor are all designed to reproduce artworks at the very highest quality possible.
In terms of direct scanning with such a machine, therefore, it helps to keep your originals to a reasonable size. A2 or below is perfect. Original at these sizes can be direct scanned, at superb quality, in a single pass. (A1 can be scanned with a single stitch operation if you do really need to go bigger, but complexity of this is higher, and thus your costs will go up). So if you can stick to A2 or below for your originals, that will greatly ease the downstream processes and help keep your costs manageable. Remember - you want to be scanning every artwork you make, ideally, so that you have an ongoing high quality digital archive of your work.
(Indeed, sticking to the 'A size' system - for your original, and for your reproductions - can have huge workflow and sales benefits generally, and is a very good idea - feel free to ask us more about why this is!).
Use Un- or Minimally- Textured Materials
If the goal of an original artwork is primarily as a source material for a digital file that will then be used for sundry other things, you can make the process a lot easier by avoiding texture in your original works.
The easiest way to do this it to originate your works on smooth, non-textured paper. Of course as artists we like working on materials that have a bit of tooth, but when these artworks are captured into digital form, ideally this texture would not be picked up. We can still ultimately reproduce the final image on to a textured paper, if we want the prints to have texture, but having texture in the scan. It's also a good idea to avoid impasto (i.e. thick, dimensional paint), if you can.
This is also why working on canvas should generally be avoided in this context - even a very finely toothed canvas will result in a visible canvas texture in your scans. When you then reproduce those works on to paper, it can look a bit odd to have visible canvas texture in your prints, on paper. Even if you reproduce the works back on to canvas, you end up with an odd 'canvas on canvas' texture effect that is undesirable.
Worth noting that the fine art reproduction market is almost entirely paper based - almost all reproduction prints are done on to fine art papers, NOT canvas (or any other materials). Canvas, as a medium for reproductions, is very much part of the lower quality/price 'decor' market - for better or worse, it's the sort of thing you see in lower quality domains (think Sunflowers in Harvey Norman), rather than in high quality, 'proper Art' domains. There's nothing wrong with the decor market per se, but if you do choose to work in that market, you're competing with outfits like Ikea and so forth, and you'll have to take a very different approach (and you'll probably do a lot more work for a lot less reward....).
Use Very White Paper
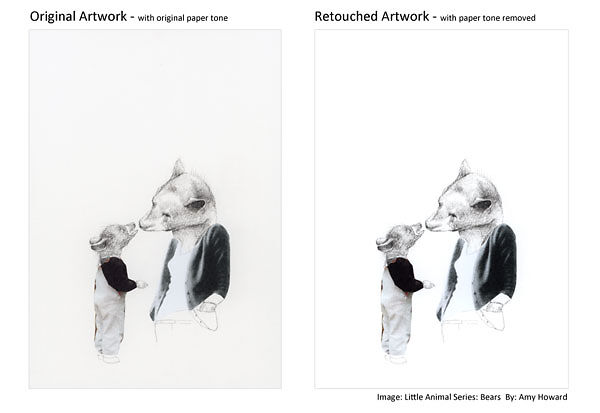
When an artwork is captured, and then reproduced back to paper, we want the reproduction to be high quality and very very similar to the original - but we also might want the opportunity to make adjustments - such as reproducing on to a textured paper, or reproducing on to a paper tone quite different to the original.
This means we want to start with as clean a scan as possible that captures the original tones as well as possible, without being influences by the paper tone of the original. Indeed, for many works, during the reproduction process, all trace of the background material is removed. That is - we don't want the prints to 'print' the paper tone of the original onto our final reproduction paper (which usually means in effect a somewhat muddy grey tone behind your image) - we want just the artwork itself to be expressed on the final print, and nature and tone of the chosen reproduction paper, to be expressed 'through' the original.
This is one of those things best explained by seeing originals and reproductions thereof (see below), but even if this doesn't make immediate sense - take our word for it. Work on paper that is as white as possible - although you want a natural white, not a chemically brightened white. Some papers have Optical Brightening Agents in them, and these should be avoided in this context particularly, as their fluorescent nature can reduce colour accuracy, significantly, during the scanning process. If in doubt, ask you Art Supplies store for a paper that is as white as possible but without OBAs - they will be able to help with this.
Starting with a very clean, natural white paper puts you in the best position to get high quality, colour accurate reproductions.
Density - Separation Between Image and Paper
This tip goes hand in hand with the above two tips about using non-textured, white-as-possible materials.
In producing an original work that is destined for reproduction, err on the side of 'heavier is better'. Here, I am talking about tonality/density, not physical weight.
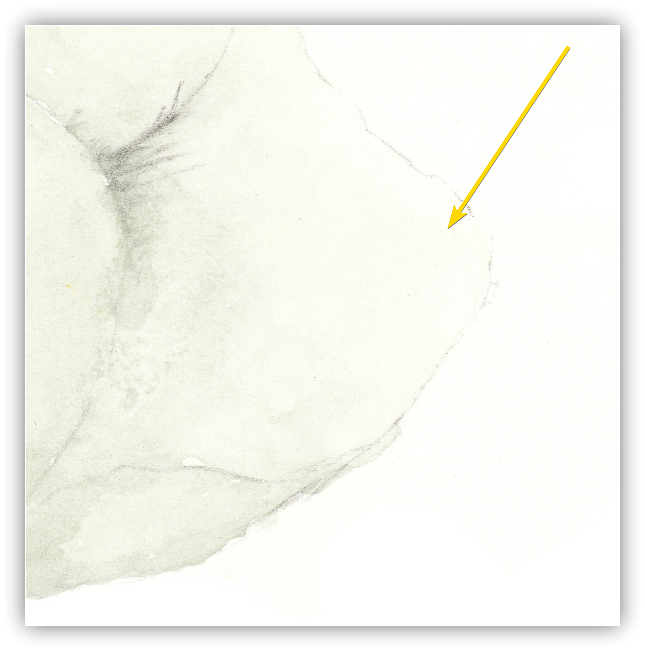
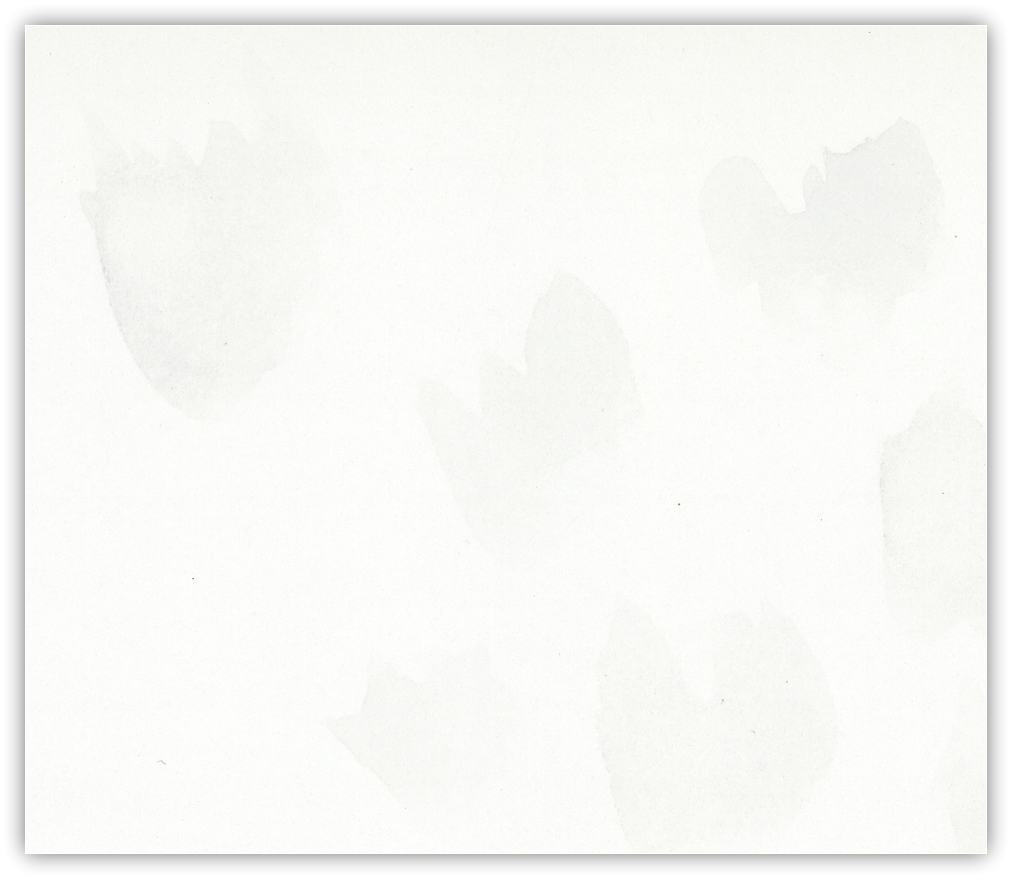
What you want is very good separation between areas where you have applied tone, and the base paper tone. This makes it much easier in the background stripping stage of the scanning process - as the machine and retoucher can much more easily separate the areas of the image that are actually artwork, and the areas that are blank paper.
This is of particular importance if you're using watercolours. Light washes can be diabolically hard to scan and separate from the background paper tone. As an example, take a leaf painted with a very light wash - whilst your eye can see the borders easily, and will 'fill in' toned areas if they are within the leaf area (this is because our brain knows it is a leaf from the shape, and thus we psychologically fill it in with colour, even if in fact the wash is so light, there may no colour observable at some points). To a brainless machine, though, parts of the light wash area are indistinguishable from paper tone...which means you won't get tone in your reproduction, or more of the background tone will have to be left in.
(Note that our 'Ready To Print' services include a time budget for retouching, and for 95% of all images, this time budget is enough...but the one common exception is very lightly toned watercolours, where often the amount of work needed to strip the background tones can exponentially increase).
So - if you work just a little heavier, your works will scan better, as both the machine and retoucher will be clearer on your intentions (and the scan can then be digitally lightened quite easily if you do find the captured results heavier than you want).
Conclusion...
Hopefully you've found some useful tips here to improve your workflow.
Print sales are by far the most active area of the art market, and anything you can do to improve this part of the process will help you get more back from the work you put in to your artworks.
As ever, Image Science can help with all aspects of the Art Reproduction and Fine Art Printing stages of the process. So if you need any advice or want to chat through the options, please do get in touch.