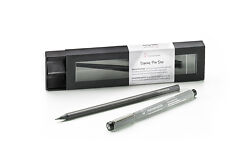
Hahnemühle Signing Pen Duo Set
A premium print signing pen box set consisting of a high quality, archival pigment ink fineliner and a soft graphite pencil.
Please note that we are open by appointment only (except for click and collect pickups once notified ready).
Signing inkjet prints sounds like a simple and obvious process, but there is more to consider than you might think.
Here follows our advice about signing your inkjet prints (AKA Giclee prints).
IMPORTANT:
This is our best advice based on the last 17 years of working in the industry but nothing in this article is a promise that a particular combination of materials we might mention is properly tested or truly archivally safe. Materials, both papers and writing implements, change over time and what worked for us might not work for you.
If in doubt, the best advice from an archival perspective is simply to never mark your prints unless it is absolutely necessary.
The best advice about signing your prints can be summarised, so:
So, if you are going to sign your prints, then there is now an easy solution for you.
Read on below for the longer discussion....
Art materials are notorious for odd reactions over time - the only sensible approach is a highly conservative one...
Probably more prints have been ruined by bad signatures than any other thing. The ruination of the print can occur immediately, but it is often only after years have passed that problems become evident.
Applying a signature (or any mark) on a print is always a risk. A risk that it will impair the print both aesthetically and, more importantly and fundamentally, at an archival integrity level.
There is a natural tendency to assume that because inkjet papers have an ink receptive coating this then implies that you can use pretty much any ink on them with safety and success. This is absolutely not the case.
Art materials in general are notorious for odd interactions over time, which is why long term testing and a highly conservative approach is the only sensible approach with making marks on prints. Different inks have substantially different chemistries - the carrying fluids that are used to deliver the dyes (or, ideally, pigments) - can vary a lot in formulation, and thus reactivity.
So really all sorts of reactions are theoretically possible, and over the years we've actually seen quite a few reactions in practise - including:
There are some sensible alternative approaches to marking prints that should be explored.
As a rule, if you can avoid signing, we recommend you do avoid signing and consider an alternative approach to print authentication (...but buyers love signatures, of course, so we recognise these are not always realistic options!).
(These two approaches are often used in conjunction with a printed signature on, or just under, the image).
Authenticity Certificates are a great option (even if you are signing the print, they work well as an extra!). You can print these yourself on a fine art paper and sign that (which has the same potential issues as signing any other print, of course, but in a less important context!) - or you can use Hahnemuhle's excellent pre-made product and registration system.
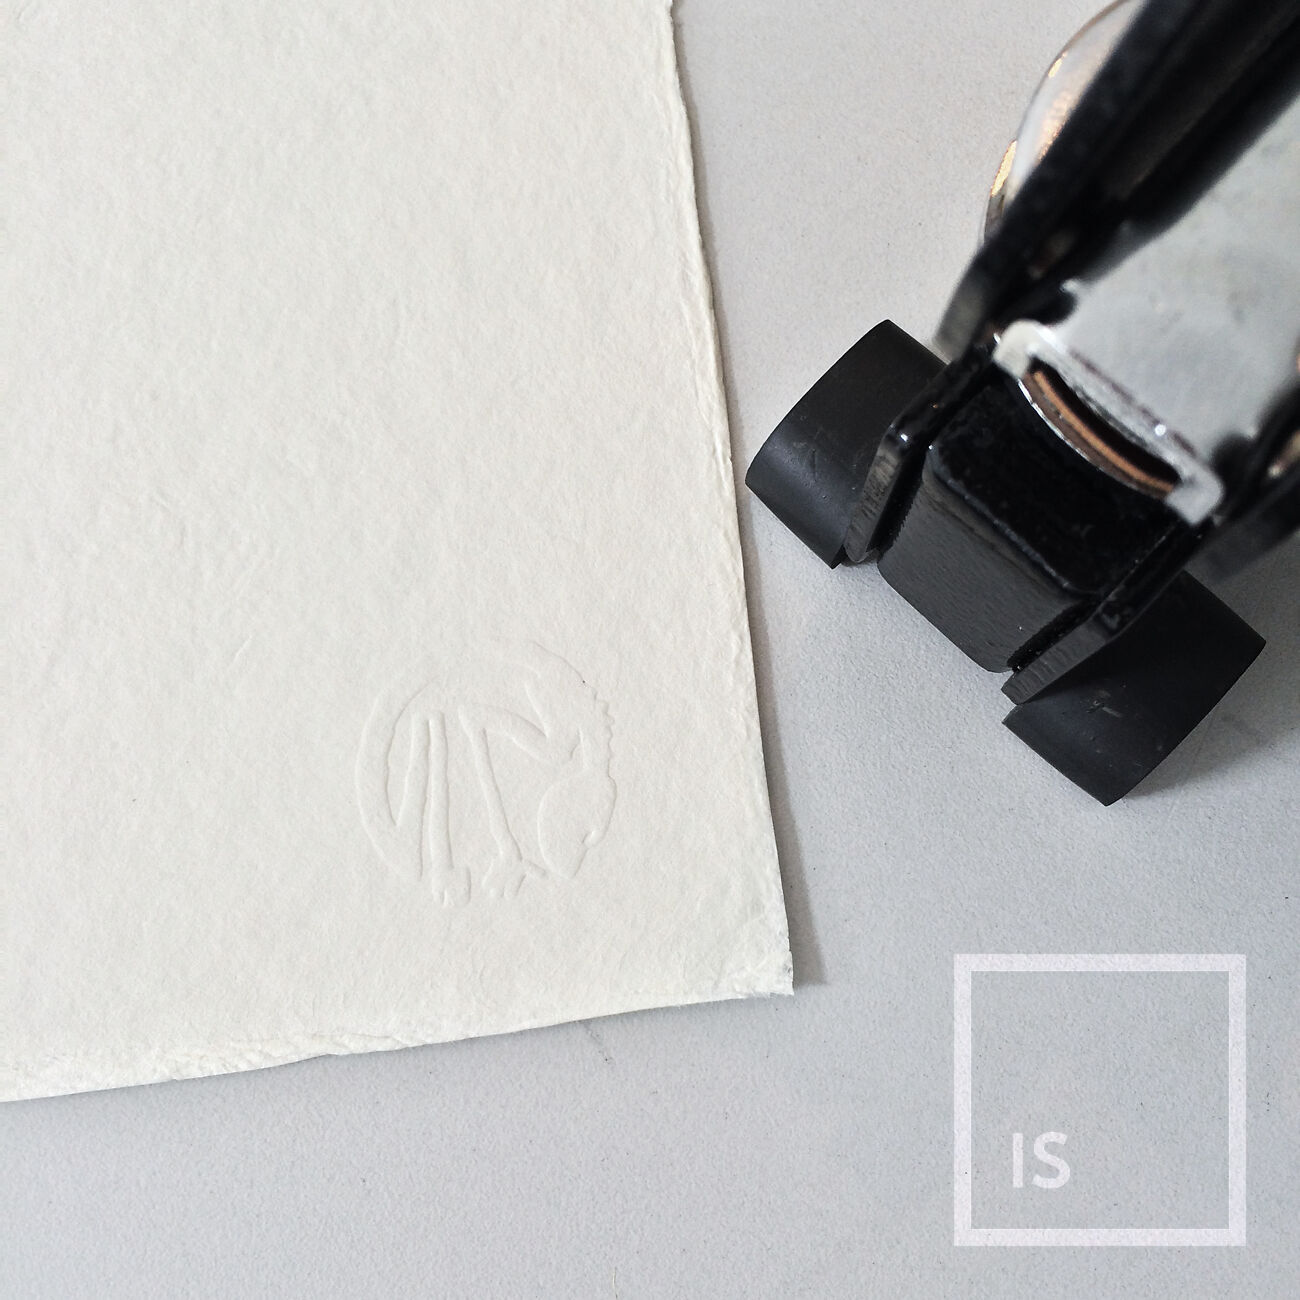
Print Embossing (AKA 'chop mark'). Instead of signing, you can mark your prints with a unique embossed mark. The setup is expensive, as a brass plate needs to be made, but the plate lasts a lifetime - and with a well designed mark this can really even improve your overall print presentation, something a signature rarely manages to achieve!

The reality is that most people need or want to sign their prints - there's simply no question that people value signed prints more than unsigned prints.
So, if you must sign your prints - what is the best way?
Graphite pencils (AKA lead pencils, grey leads etc. - i.e. your everyday pencil!) - are the best way to sign your prints - if they will work on your print surface.
Pencils work fine on any matte fine art paper (and the vast bulk of fine art prints are made on matte papers, a fortunate coincidence!). They are a proven stable and archival - so always use pencil if you can. Unfortunately gloss and semi gloss papers do not tend to accept pencil.
After signing with pencil, consider sealing your work after signing with a tested, archival print spray - which is good practise for prints anyway and in testing has been shown to as much as double the colourfast lifespan of prints.

The beauty of pencil is that, if you sign with a light touch, you can (with caution!) use a pencil eraser to solve any mistakes you might make at the time of signing. Indeed, pencil erasers are a handy tool in general with inkjet prints that can often remove light marks, smudges etc, that may accidentally occur when handling prints.
If you must sign using a pen, then test, test, test. Be aware that sometimes problems can take years to become visible. So doing some online research here can really pay dividends and avoid a later calamity.
Most pens will simply not write well on inkjet prints - the ink receptive microporous coating on prints will not allow ink to flow from pens in the same way as it does on uncoated papers, so even in physical writing terms it can be hard to find a good pen.
In addition, most pens are not really archival, and many will react with the inkjet print coating over time. So real caution is needed here. Do not use:
You should use an archival, pigment based pen, one that is designed and tested for use on artworks. These are typically available from artist supply stores.
We have personally used Staedtler Pigment Liners and Artline Pigment Metallic pens with success, and no visible adverse effects (checked yearly for over 15 years).
Disclaimer: this does not mean, of course, these will work for you and your scenario/materials - we're making no promises!! Do your own research, test your process, and make your own decisions.
Sign The Front Of The Print
Signing the front of the print is safer than signing the back.
If you sign the back, you risk the signature coming through to the front of the print and spoiling it.
This can happen immediately if too much pressure is used, or it can happen years later as pigment is wicked through the paper fibres to become visible from the front.
And, if your print is mounted to a board during framing - as many are - then your signature on the back is lost anyway.
Sign Outside The Image
Signing outside of the actual image area is more sensible than signing on the print itself - because if any visually adverse issue does occur, the print is at least not ruined and potentially the signed area can be removed.
Of course this does limit framing options as some white space must then be left around the image area for the signature to be visible. But in reality this breathing space is almost always a good thing visually, and this has become the de facto standard approach for farming fine art print work.
Title On Left, Signature/Number On Right
Not a rule, but merely a convention, based on the fact we read left to right.
The title, if there is one, is usually placed below the lower left corner of the image.
The signature and edition number is usually placed below the right corner of the image.
Chop marks (used with or without a signature) - are placed below the image area, but I don't think there is a convention as to which side. (Do NOT place the chop mark on the image - it's very easy to damage the printed surface this way.
(In general avoid titles - if your image has a title then this, and any extra information, is best placed on an authenticity certificate or information sheet supplied along with the print).
Make It Beautiful (Use a Monogram?)
I can't tell you how many re-prints we've done over the years because customers hate their own signatures and feel like they've ruined a print by signing it.
Remember - this is not your 'real' signature - practise, practise, practise and make it as visually appealing as possible. Use a monogram or symbol instead of a signature, if you wish - this has ancient precedent in the art world.