Getting Started with Dinax Mirage Print
Mirage is powerful printing software.
At first glance, there is quite a lot going on, so we've written this guide to make it easier to get going with your new software.
This guide helps you:
- Set up your printer in Mirage
- Set up media settings
- Make basic prints with Mirage
- Print ICC profile targets with Mirage
Let's begin!
Introduction
Mirage makes printing easy, but like any powerful application, it can take a little while to get to know your way around, and get comfortable with it.
We aim to make the process easier with this guide.
We'll assume you've installed Mirage and entered your license code. If you haven't do so now!
This guide is going to cover the basics of making prints with Mirage - just printing single images to a page, with the correct media settings and colour management in place. More powerful features, like tiling/templates etc., we'll leave you to explore...but first let's master the basics and get on top of the approach Mirage uses to making prints!
UPDATE: Please see the bottom of this article for some additional new very helpful resources:
- The official Mirage 2025 Manual PDF
- A PDF guide on manually installing ICC profiles into mirage
- An Epson-produced PDF guide on setting up and using Epson printers with Mirage
Dinax Mirage Print
Modes of Use
In this guide, we're going to cover using Mirage as a stand alone printing application.
Mirage can also be used as a plugin for Photoshop and Lightroom, if you prefer this approach. I.e. you can go from editing your image in one of those applications directly to printing that image in Mirage, if you wish, rather than exporting a file then opening that in Mirage. This can be a bit quicker/easier, but in our experience a lot of people end up creating exported files and then using Mirage as a separate app - and this is generally quicker for things like repeat prints, as you don't have to first fire up your imaging up and then export to the Mirage plugin.
Of course, you can use either approach, or both, as you see fit.
Note the Photoshop plugin comes free with Mirage, but the Lightroom Plugin is a paid extra for some strange reason (well, the reason is cheapness on Dinax's part, I suppose!).
Dinax Mirage Print
Set Up Your Printer(s)
N.B. Make sure your printer is on, and connected to your machine/network before you begin!
N.B. If your printer is connected as a network printer, make sure that you've set up your network so the printer had a fixed, consistent IP address, and make sure you know what that address is!
When you first start Mirage, you will likely see the Mirage Printer Wizard. (If for some reason you don't, you can select 'Edit' or 'Add Printer' from the 'Print To:' dropdown menu on the main screen instead).
Usually, you then just select your printer from the list. If your printer has not come up in the list (it's turned on and connected, right? N.B. Sometimes things like anti-virus can interfere with Mirage scanning the network for printers) - you can also 'Add Manually...' if need be.
If you're adding your printer manually, you'll need to initially select the model (e.g. Epson P900 Series for an Epson SC-P906) - and then basically you just need to enter the IP address (Mirage will auto-detect all USB printers). Leave all the other settings as is (unless you know exactly why you're changing them!).
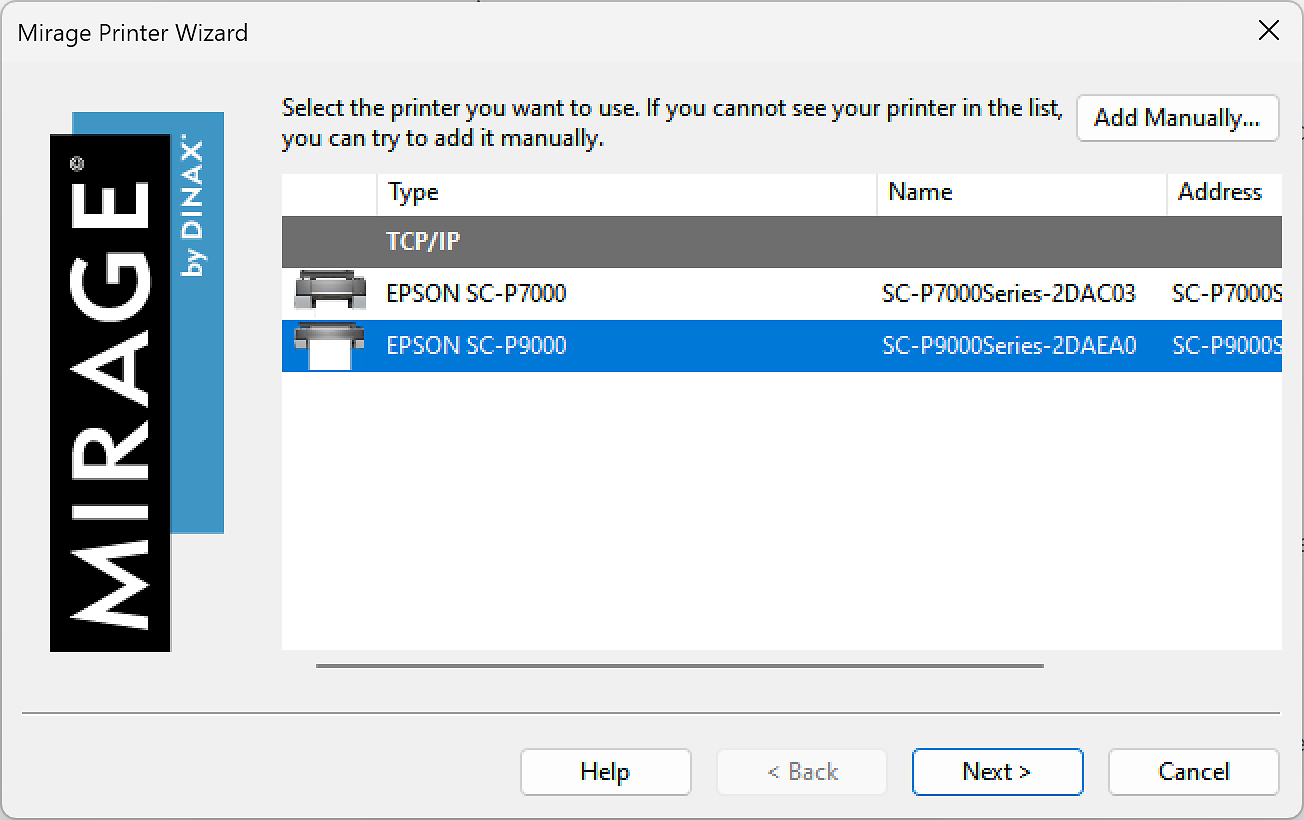
Of course - as long as the license you bought supports the printers you have - you can add multiple printers at this point, too, and then easily switch between them on a job by job basis.
If you'd like to explore more advanced settings for your printer, you can do this using the 'Settings' button to the right of the 'Print To:' drop down.
Dinax Mirage
Tour of The Main Window
The main window of Mirage is quite busy and intimidating initially - but it's a one page tool that has everything you need on it to control pretty much all your printing, so that's not too surprising! You'll soon get used to it once you know where everything is.

Printer and Media Settings
All your key printer and media settings are centralised and managed from the top panel, and we'll cover this in more detail in a moment.

Printing Controls
On the left hand side you have the Printing Controls.
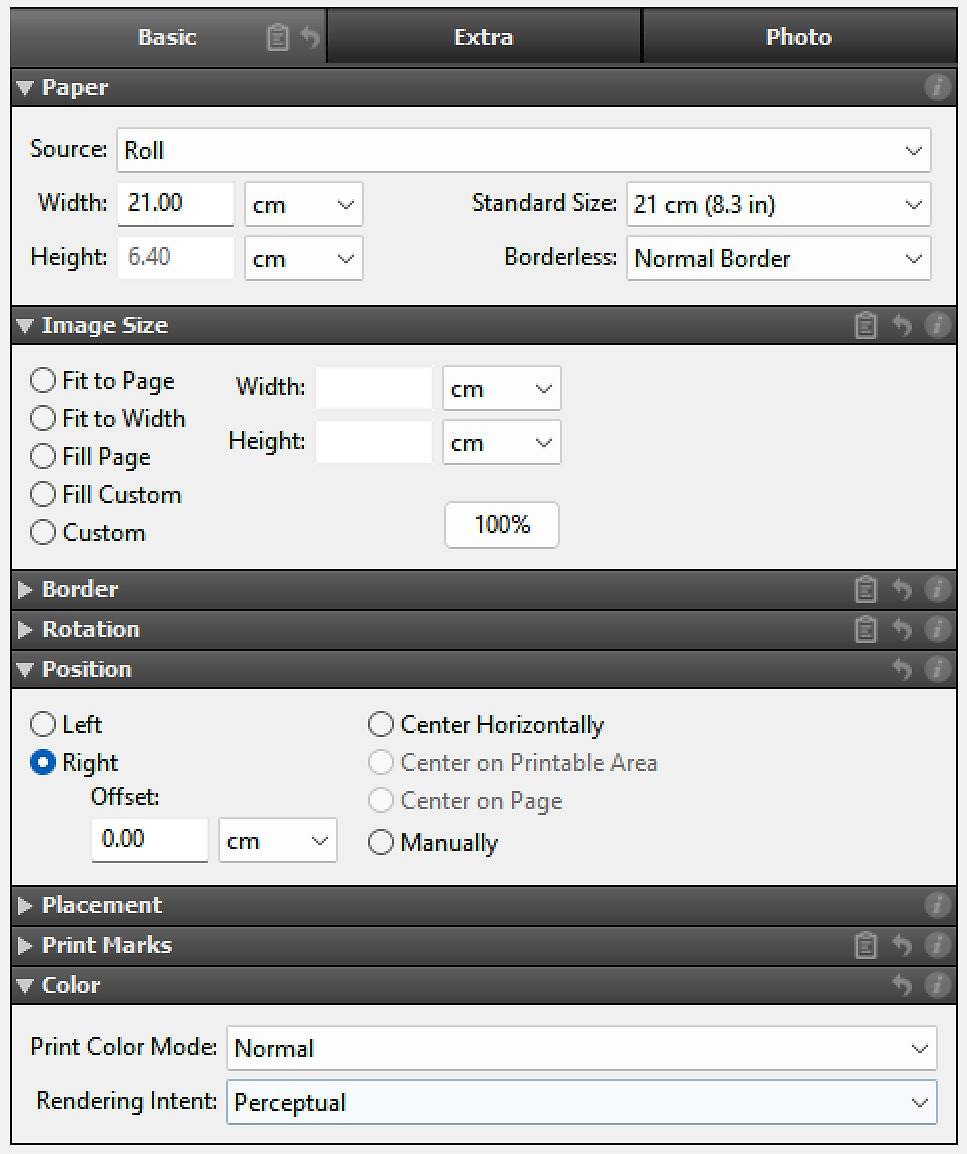
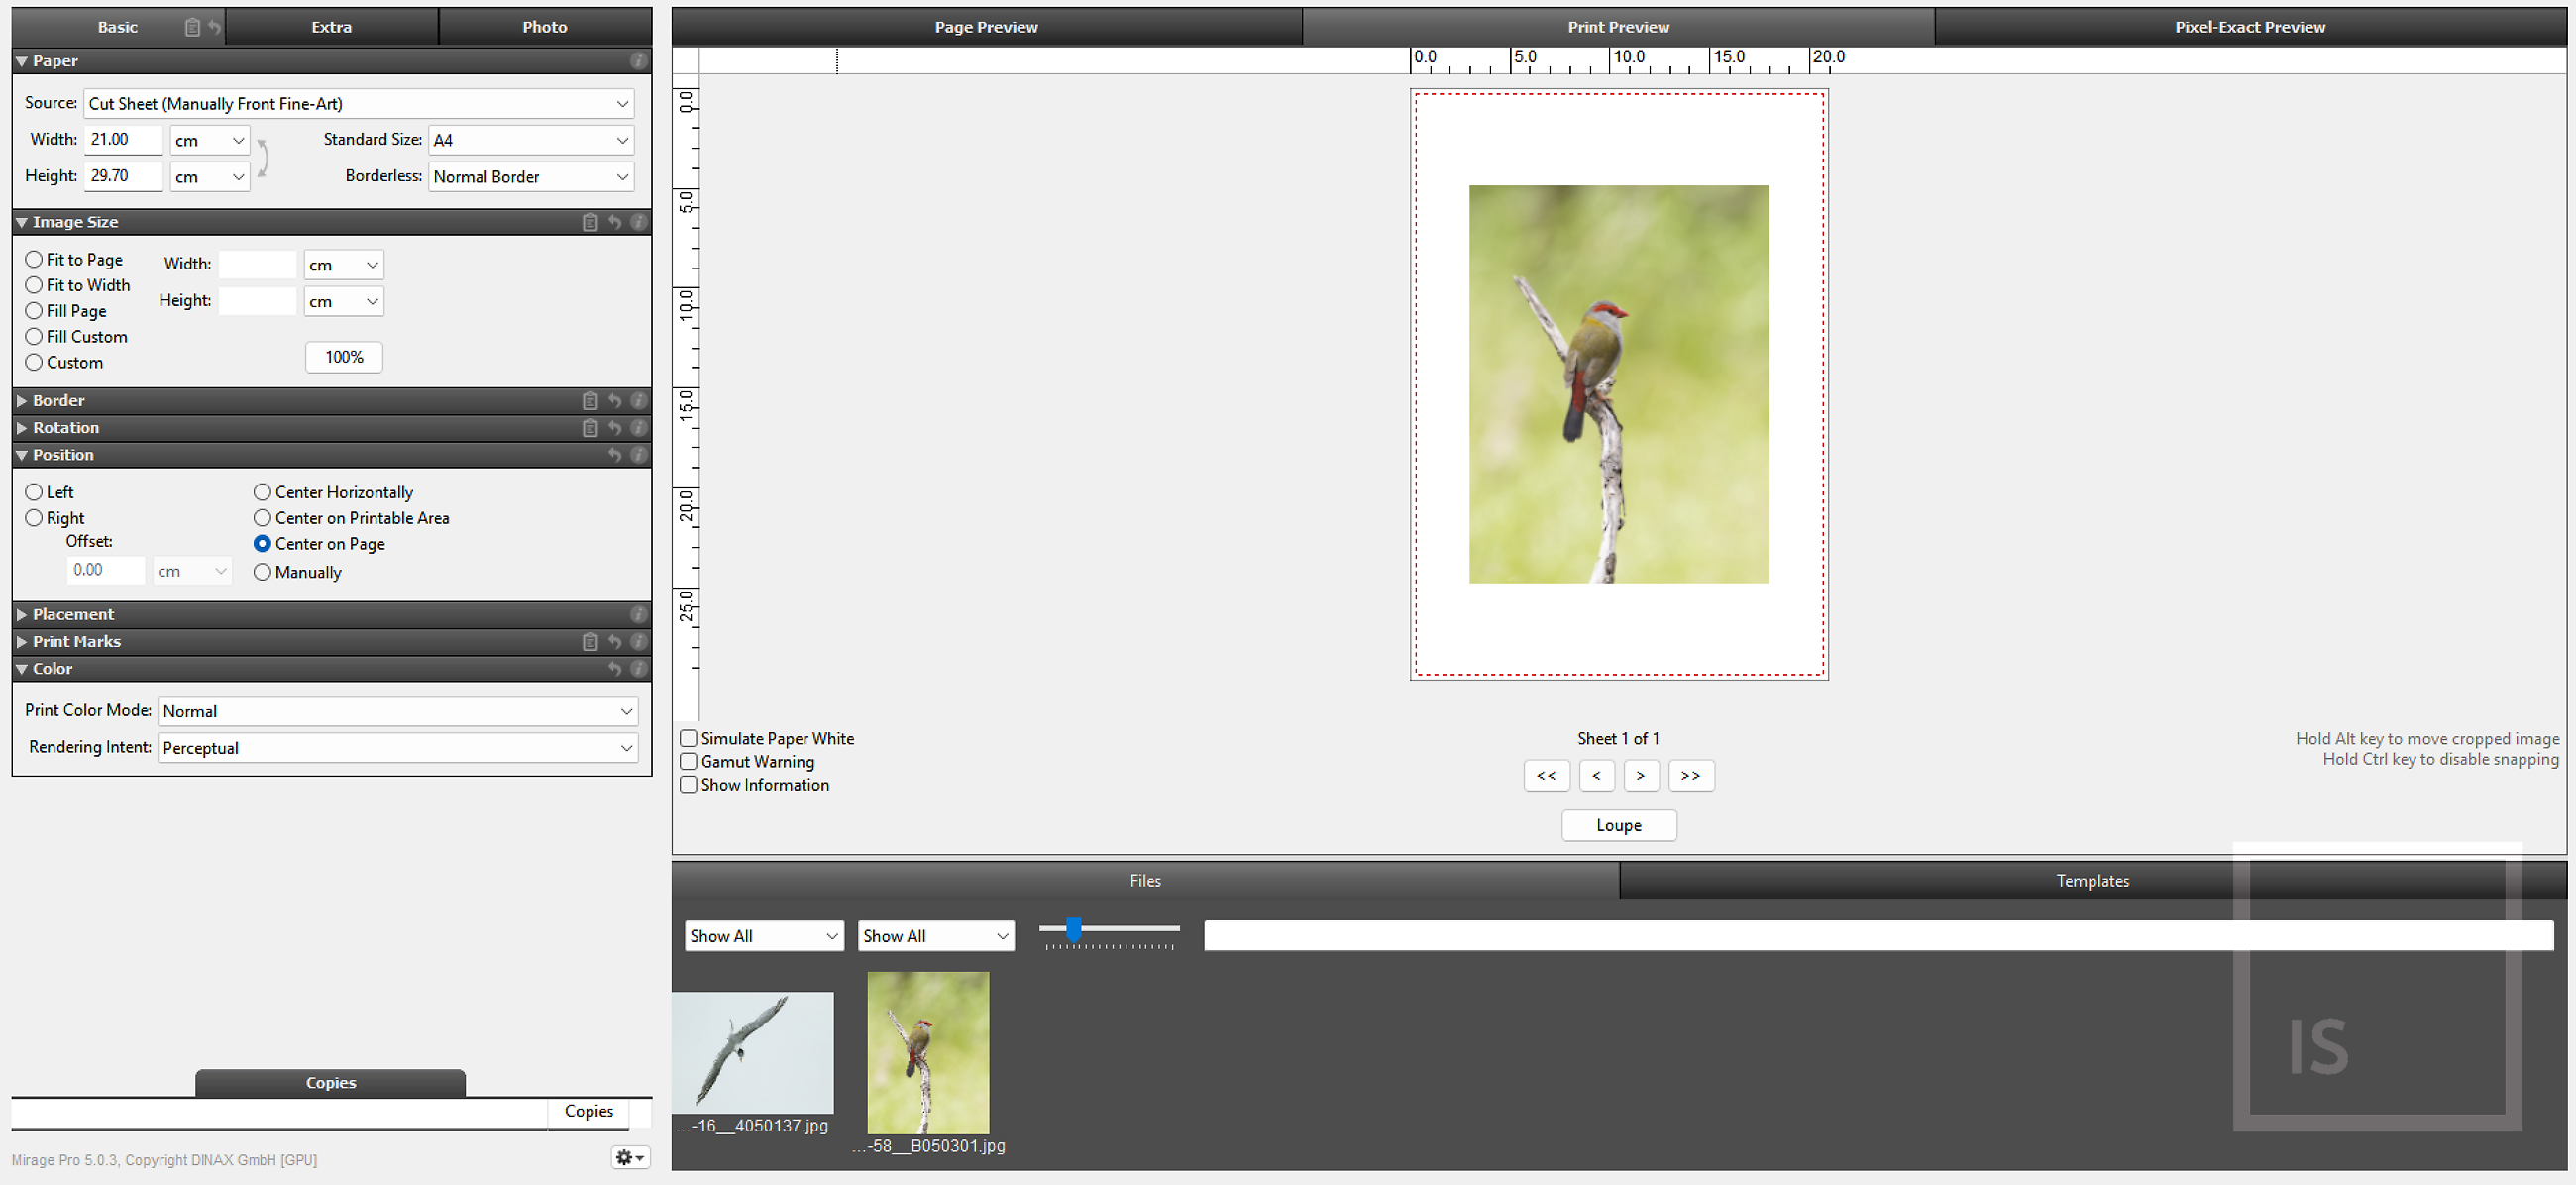
The key tab here is labelled 'Basic' - this is where the most fundamental controls live, controlling size, placement, and some aspects of colour management.
There are extra tabs, 'Extra' and 'Photo' which we won't really cover in this guide. The 'Extra' tab has controls not normally used in day to day printing, and the 'Photo' tab has filters and adjustments (like sharpening etc.) - but most people do these in their image editing programs before they move to using Mirage - and that's our recommendation generally, as the tools in dedicated editing applications tend to offer more control & ultimately better results. However for some batch printing scenarios, doing these adjustments in Mirage might make sense.
Preview Area and File Management
The main panel is the Preview Area and has File/Template management at the bottom (and not that in many cases with Mirage, you can 'undock' the panels and move them around, if the default layout doesn't suit your needs, e.g. if you're working on multiple monitors).

There are three preview modes - Page Preview, Print Preview (the one we normally use) and Pixel-Perfect preview.
In this image I have skipped ahead a bit and dropped an actual image on to the preview and begun the page layout.
But before we can get on with the actual printing, we need to set up our media.
Dinax Mirage
Setting Up Media
There are three real ways to set up Media in Dinax Mirage Print.
Media Setups in Mirage encapsulate all the settings that will be used whenever you select that media. Once setup, you never need to remember anything or deal with presets or the confusion of what part of your printing comes from the application and what comes from the driver - just select the media from the list and Mirage will automatically use the correct setup, for each and every print.
This includes the print quality level, all advanced print settings like ink density and paper feeding tweaks, and also the ICC profile to use.
(However, note the rendering intent is specified on a per print basis, rather than in the media setup, which is contrary to how most RIPs work).
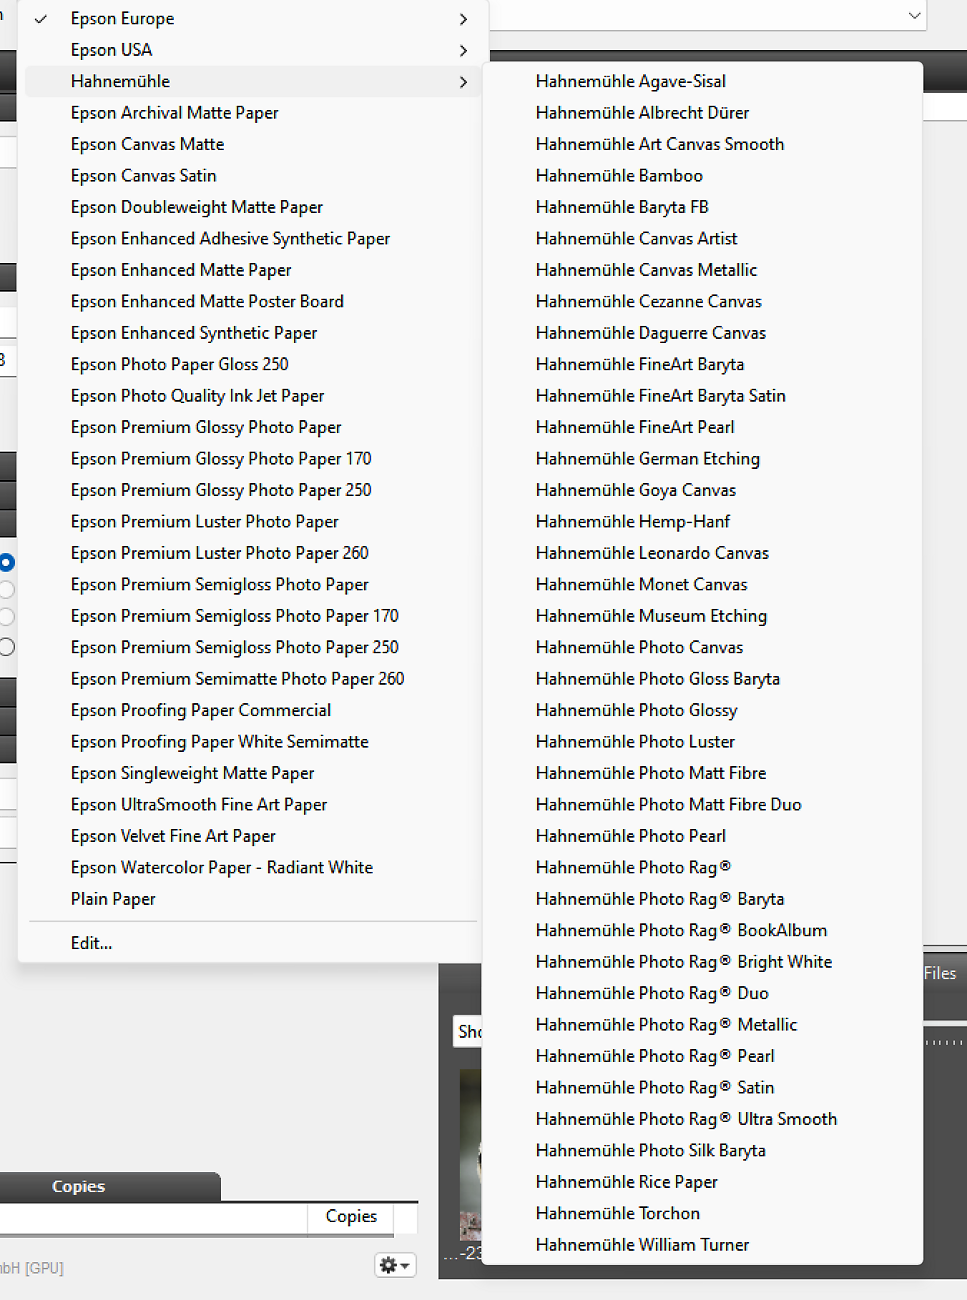
Default Installed Media for a Printer
When you install a printer in Mirage, it will install media entries for all the default media types for that printer. (Basically, the same list you would see in the normal driver).
You probably don't use Epson paper (does anybody??) - so you might be tempted to delete all of these. However, it's best to leave these in place, as the easiest way to add custom media (see later) - is to duplicate one of these Epson listings as the 'base type' and then build from that.
Media Packages from Paper Suppliers
The major fine art paper manufacturers - Hahnemühle, Ilford and Canson- have all released media packages for Mirage.
With these, you can download a zip file, and automatically set up for ALL the media from that manufacture. This is a very convenient way of getting started with new media, as everything is installed in one go - all media, all settings for that media, and all ICC profiles and settings for those, are taken care of for you - just by choosing 'Install Media' and pointing Mirage at the downloaded .zip file.
All the papers from that supplier will automatically appear under a sub-menu, which helps to keep things organised and tidy.
(If you do find yourself needing to modify any settings for one of these entries, you would need to 'Duplicate Media' and change the settings in the new media).
Custom Media Setups
You can also create completely custom media setups, using all the standard driver controls.
This is, in practise, done by selecting an existing Mirage media type, and duplicating it. Then tweak the settings as needed (e.g. installing your custom profile) - and rename as appropriate.
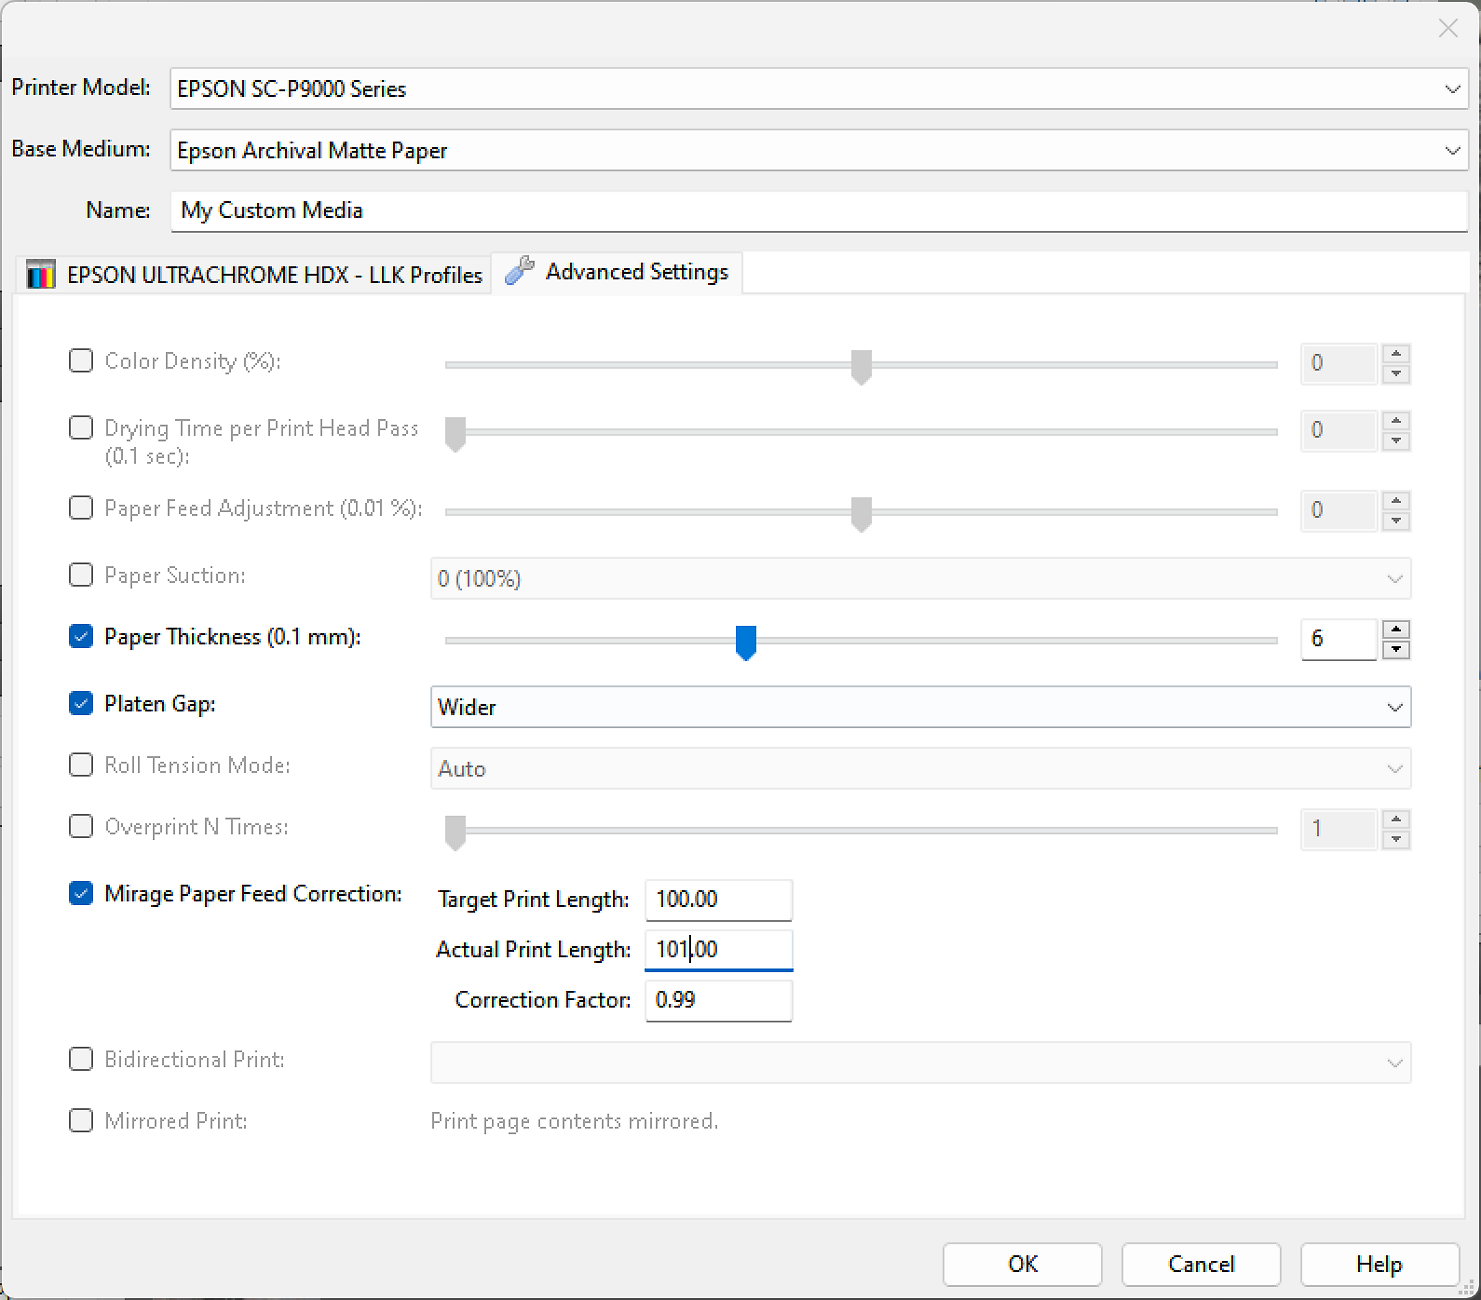
In the media setup above, I have kept most settings at default, however have changed the controls to deal with media thickness and how far the head is kept from the media (Platen Gap).
I have also used Mirage's easy to understand setting to cope with media feeding irregularities. This is most commonly experienced with canvas due to the stretch you can experience when printing on woven materials. In a nutshell, you make a print (ideally a long one, here 100cm), and enter the measured length (here the print was measured at 101cm) - and Mirage calculates a feed correction for you. With this in place, your prints should come out much, much closer to the actual size you desire.
Dinax Mirage Print
Let's Make A Print!
Now we've got our media setup, let's actually make a print! Of course, first, make sure you've selected the Printer and Media you're using in the top panel.
There are many ways to send files to Mirage (e.g. via Photoshop or Lightroom) - but the easiest is to just grab an image from your computer and drag and drop it on to Mirage's 'Drop Files Here' area.
Once you do so, your image appears in the main window. (Note - and particularly relevant if you're printing multiple images - the currently selected image (to which the controls will apply) is given a blue border).
From here, making a print is quite simple.
Start by selecting the paper source and size of paper you're going to use (e.g. on an Epson P906 most fine art media is loaded via the front load method).
Essentially, you then run down the sub-panels of the 'Basic' tab of the Print Controls panel on the left hand side. There are controls for sizing and layout there. You can also use jut re-size and re-position the image on the preview window directly, if you prefer.
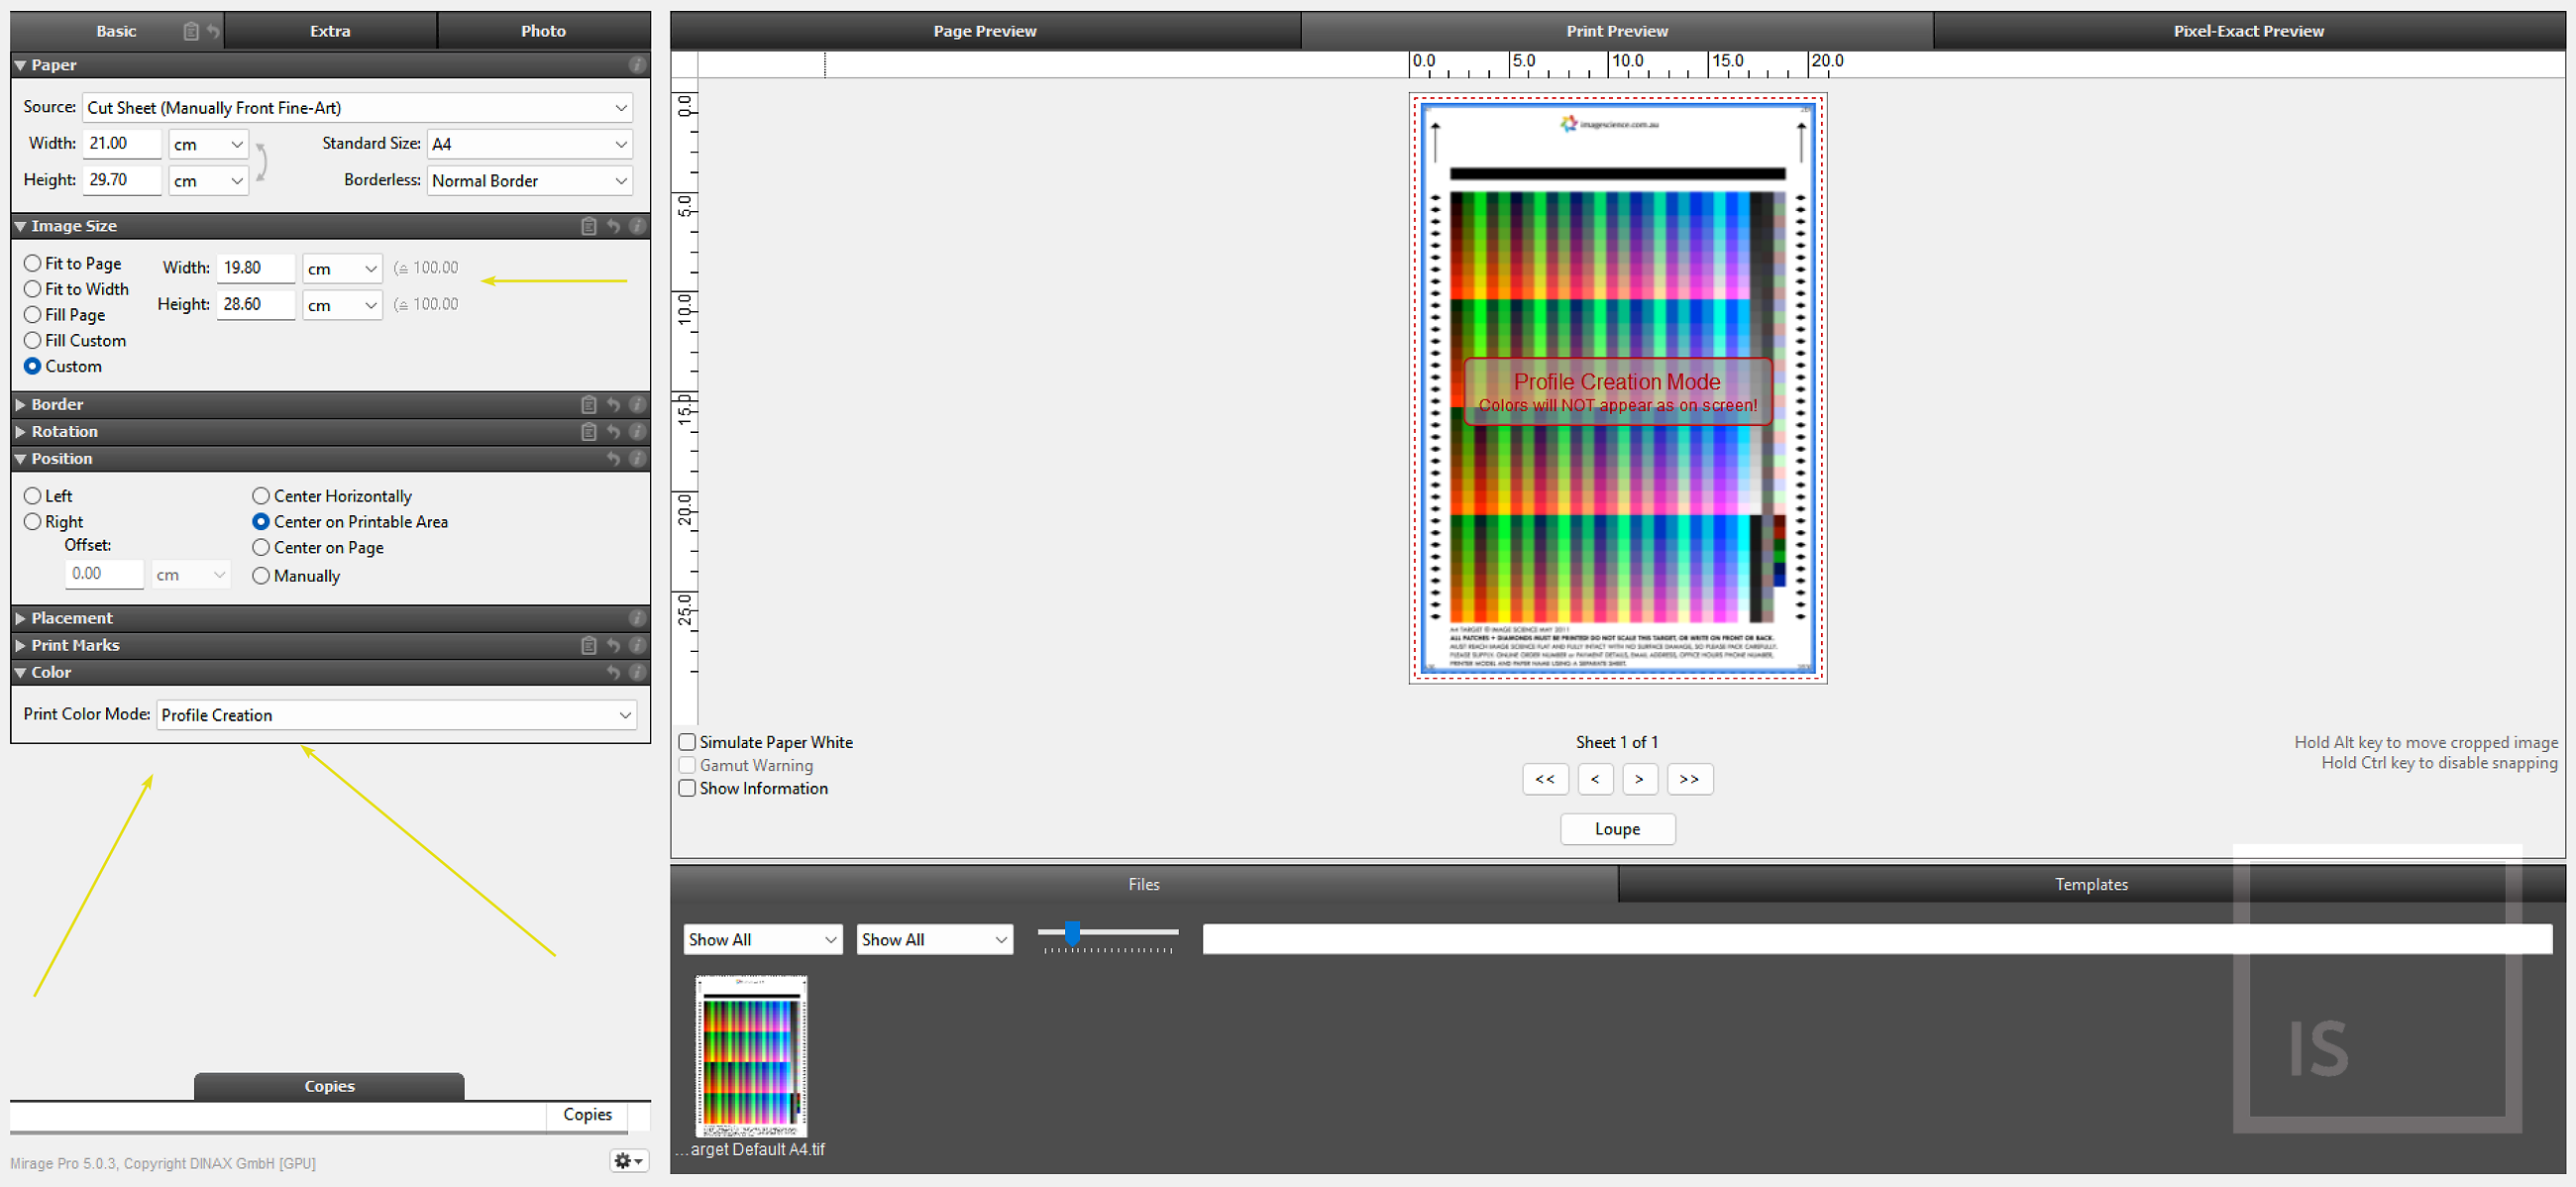
Worth noting is the Print Colour Mode sub-panel. In this, you will see different options depending on your printer. E.g. with an Epson P906, can choose 'Normal' for standard colour printing, 'Gray' to use the Epson Advanced Black and White printing mode (albeit Mirage does not offer the full toning controls the Epson driver offers, unfortunately). There is also a 'Profile Creation' mode to print ICC Profile targets (more on this below).
You can also choose here the ICC Rendering Intent to use for this print.
(Note that the preview controls 'gamut warning' and 'simulate paper colour' are just as bad/inaccurate as Photoshop's versions of these, and we suggest you ignore these options).
More Advanced Printing
That's all there is to get going with Mirage and make basic prints with it. By now you should have a bit of a feel for the approach and how the application works.
There is MUCH more power available - e.g. it's easy to print many images at a time. And a comprehensive job management system that is super handy if you're doing e.g. Editioned Prints, where you need to re-print the same images across weeks, months or even years. And there's a fantastic templating system that you can use to make things like cards & calendars very simple to print.
From here, you can learn that by experimenting, of course - and by using Mirage's manual / online help (Help button in the bottom right hand corner, where there is also a link to a PDF manual you can print if you wish).
Dinax Mirage Print
Printing ICC Profile Targets
Mirage makes it very easy to print ICC profile targets.
First, as described above, set up your printer, and the media settings. Leave the ICC profile area blank for the moment (even if you do have ICC profiles specified in there, Mirage will correctly ignore those when printing your target anyway).
Then, open the target image in Mirage and make sure you're printing it at the size it specifies (i.e. don't make any changes to the default size that comes up - but you might want to centre the target on the page).
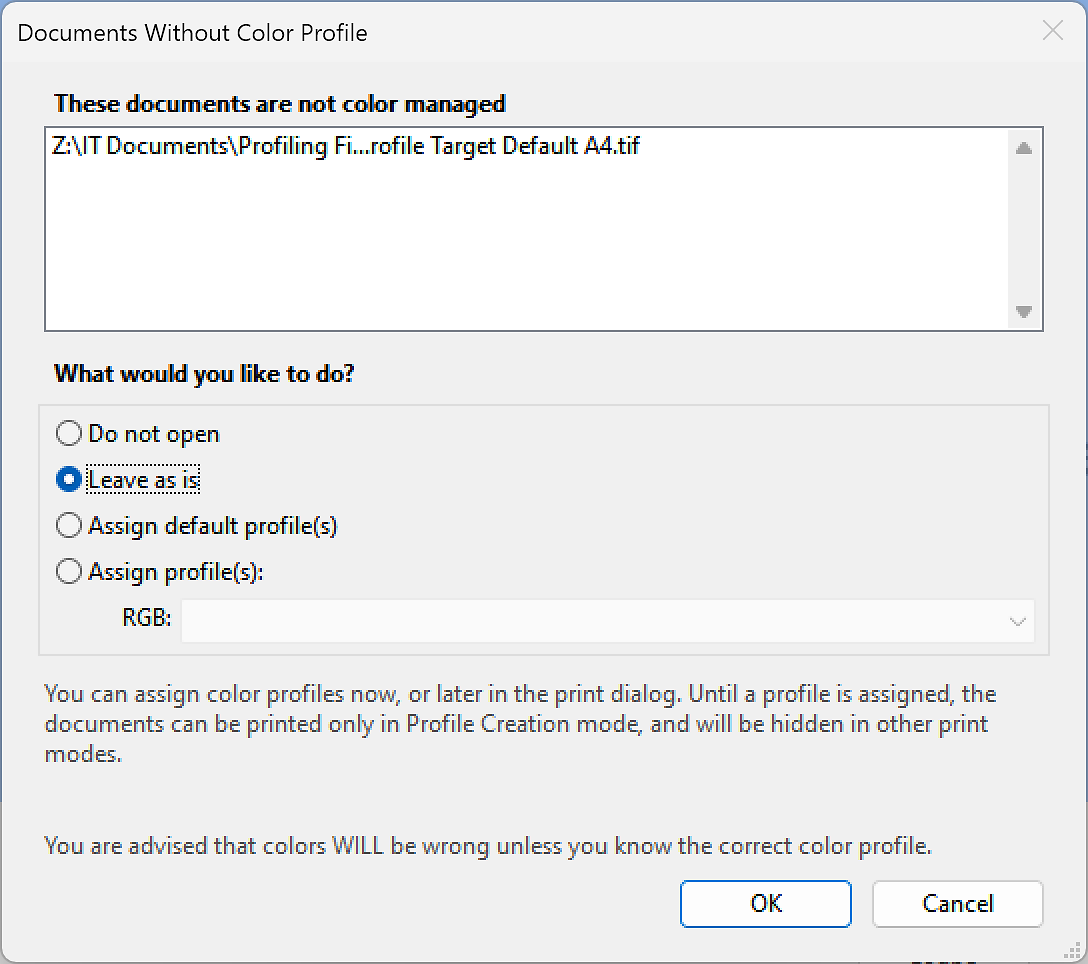
As ICC Profile target images are deliberately not colour managed, you will get a warning from Mirage, and you should choose 'Leave As Is' from the options:
Mirage will most likely automatically set Profile Creation mode, but do check it.
You're now ready to print your target!
Print it out, leave it to dry for 24 hours, and send it in and we'll make your ICC profile. When you get your profile back, just go back into the the media setup and add it there, and you should forever more have easy, highly quality, and accurate printing!
Don't forget to submit your matching online order if you haven't already (if you have free profiles, e.g. those that came with your printer, you don't need to submit an order - just send in your target with a note referring to the original order).
Additional Resources