

A technical article going into the methods necessary to accurately and correctly compare prints to screen, and the challenges of doing so.
Introduction
Prints versus screens have several fundamental differences at a physics level that make direct side-by-side comparisons almost impossible. Holding a print up next to your monitor in order to compare them does not work, and today we're going to investigate why.
Much of the below information is covered at length in our Fundamentals of Digital eBook, so go have a read if you're interested in a deeper level of understanding.
A quick disclaimer: this article is written in the context of fine art printing and its associated workflow and goals. Areas outside this domain don't necessarily follow the same standards or goals, so what we're discussing here won't necessarily apply to other areas of printing (e.g. textiles).
The Foundation
What Is 'Colour'?
Colour is an illusion. That is, it is constructed in our mind. 'Colour' itself is not an inherent property of matter. It is all perception based, related to an object's light absorption and reflection characteristics and the environment around it. The colours we see are simply our brain's way of expressing the combination of certain wavelengths of light and the specific way they excite the three types of cone cells in our eyes.
When incoming white light (light that contains a healthy mix of all wavelengths) hits an object, certain wavelengths are absorbed and/or scattered by the object, while others are reflected off it.
Colour Models
At a most basic level, we have two main ways (or models) of describing how colour is created:
- Additive Primary Colours are red, green, blue — because we add them together to get all the colours.
- Subtractive Primary Colours are cyan, magenta, yellow — because we use these colours to subtract reflectivity from white (i.e. paper) to get all the colours.
These are not competing theories — they are the two most practical ways to create the perception of colour, and they're intrinsically linked, as we'll see below.
The Differences of RGB vs CMY
These models differ in two main ways: additive vs subtractive, and emissive vs reflective.
RGB (red, green, blue) is the language of light — it is additive and emissive. It's used in things like computer screens.
CMY (cyan, magenta, yellow) is the language of ink — it is subtractive and reflective. It's used in physical printed things.
Additive vs Subtractive
When we say RGB is an additive colour model, we mean it starts with darkness (black) and adds red, green and blue light to create a spectrum of colour. Add enough of each, in roughly equal parts, and you get pure white. Add differing amounts of each and you get the spectrum of all possible colours.
The overlapping of two additive primary colours (red, green, blue) results in one of the subtractive primary colours (cyan, magenta or yellow) — for example, a 50:50 mix of red and green light gives yellow, 50:50 red and blue gives magenta, and 50:50 green and blue gives cyan.

CMY, on the other hand, is a subtractive colour model — the combination of cyan, magenta and yellow ultimately results in black. We use these colours to subtract reflectivity away from pure white (i.e. paper) to create a spectrum of colour.
The overlapping of two subtractive primary colours (cyan, magenta, yellow) results in one of the additive primary colours (red, green or blue) — for example, lay down a 50:50 mix of cyan and yellow ink and you end up with green.

In terms of ink, when a piece of paper is hit with white light (containing all wavelengths):
Cyan ink absorbs the red wavelengths of light and reflects green and blue light. Our brain broadly interprets a combination of green and blue wavelengths as cyan.
Magenta ink absorbs the green wavelengths of light and reflects red and blue light. Our brain broadly interprets a combination of red and blue wavelengths as magenta.
Yellow ink absorbs the blue wavelengths of light and reflects red and green light. Our brain broadly interprets a combination of red and green wavelengths as yellow.

As you can see, additive and subtractive models aren't disparate — quite the opposite, they're intrinsically interlinked.
Emissive vs Reflective
Another fundamental difference between RGB and CMY is that RGB is emissive, while CMY is reflective.
Think of the RGB of a computer screen: it starts with black and emits light out of itself (hence emissive). In light systems, you get more saturation by adding more light together, so saturated colours tend to sit at the higher end of the brightness scale.
CMY, by contrast, is reflective — we start with pure white being reflected off a piece of paper, and subtract certain wavelengths away from that pure white using ink to create colours. With ink systems, you create more saturation by adding more ink (subtracting further from the paper's reflectivity), so your more saturated colours tend to sit at the lower end of the brightness scale.

The Problem and the Solution
The Problem
As you'll have seen by now, screens and prints construct colour in totally different ways.
Because of this, the environmental lighting conditions needed for accurate perception of a monitor's emissively constructed colours are totally different from the lighting conditions needed for critical analysis of a print's reflectively constructed colours. It's impossible for both to coexist in the same space, under the same lighting, without perceptually invalidating one or the other in some way.
This is why comparing the results of these differing models directly side by side is fundamentally flawed, and why holding a print up next to a monitor to compare them just doesn't work. The physics of light doesn't allow an accurate direct comparison to take place.
The Solution
The question then becomes: how am I supposed to compare my prints to my screen?
The answer — counterintuitively — is that you need to look at your monitor and your prints independently.
Because it's not possible to view both print and screen directly together under the same lighting conditions (they construct colour totally differently, and light sources are rarely spectrally identical), you view each one independently, under separately controlled lighting conditions, and let your eye's natural chromatic adaptation compensate for these inherent differences.
This is actually a good thing: independently controlling a screen's and a print's lighting conditions lets us effectively compensate for their differing ways of constructing colour, and ultimately gives us a closer comparison than if they were viewed side by side.
We'll cover monitor and environmental light control first, then print viewing and analysis lighting.
Monitor Light Control
This is a two-part story. Not just the characteristics of a monitor's light itself, but the characteristics of the light in the room the monitor sits in, are equally important to control for accurate viewing. They go hand in hand — it doesn't matter if your monitor is perfectly calibrated if you then put it outside in direct daylight. The environmental lighting conditions around your monitor affect your perception of its colours as much as, if not more than, the characteristics of the monitor's light itself. If either aspect is deficient, it invalidates the accuracy of both your calibration and your perception of colour overall.
Monitor Calibration
Monitor calibration is the most common way of controlling the characteristics of a monitor's light, in order to more closely match a printed paper result.
We've talked about this at length in various articles across our site, and it's hard to overstate the importance of correctly calibrating your monitor, particularly for print work.
Calibration lets you control things like luminance (brightness), white point (colour temperature), contrast ratio/black point (to mimic the comparatively limited contrast ratio of paper), gamma and gamut.
The figures for correct calibration, by purpose, are officially specified by the International Organization for Standardization, which publishes two applicable standards: ISO 3664 and ISO 12646. In plain language:
- ISO 3664 covers environmental lighting conditions for viewing screens, monitor calibration settings for output destined only for screen-based use, and lighting conditions for critical evaluation of printed output.
- ISO 12646 covers monitor calibration settings for soft-proofing images destined for print. It's designed to match, as closely as possible, the characteristics of photographic papers and the relative brightness of ink on that paper. Environmental lighting and print viewing conditions are covered separately, in ISO 3664.
Technically, for screen-to-print matching, we ideally want our monitor calibrated to ISO 12646, with our room lighting and print viewing setup calibrated to ISO 3664. That's the ideal set of standardised settings to theoretically give the best match from screen to print.
The harsh reality is that these standards disregard several important practical considerations — namely spectral discrepancies across light sources, a monitor's diminishing spectral response as it moves further from its native white point, and differing final viewing conditions.
So our actual, practical recommendations for monitor calibration settings deviate slightly from the ISO standard. This isn't a mistake.
Through extensive testing and years of hands-on experience, we've found the following settings give the best results for the majority of situations and the majority of people:
- Luminance (brightness): 90cd
- White point (temperature): 5800K
- Black point: 0.4cd (200:1 contrast ratio)
- Gamma: 2.2
- Gamut: Full/native, or custom profiled
A brief explanation of the reasoning behind these settings:
- A brightness of 80cd is recommended if you're in a perfectly compliant ISO 3664 lighting environment, but more often a touch higher at 90cd if you're in a brighter environment — which is true for the vast majority of people.
- A white point closer to 5800K gives the best result for most people. Most monitor backlights are calibrated and designed for maximum accuracy and performance at 6500K (D65); the further you push away from D65, the less spectrally accurate it gets. 5800K is a middle-ground compromise: warming up from D65 towards D50, but not going as far as D50, where things can get spectrally messy (more on this later).
- Your black point is determined by the contrast ratio of the paper you're printing on — the maximum difference between the brightest paper white and darkest inky black. Matte papers have a lower contrast ratio than gloss papers: around 150:1 to 200:1 for matte, and 200:1 to 250:1 for gloss and semi-gloss. A ratio of 200:1 is a safe middle-ground figure. To calculate your black point from your contrast ratio and luminance, take your monitor's brightness level (say 80cd) and divide it by your contrast ratio (say 200) to get your black point — roughly 0.4cd in this example.
- Gamma should almost always be 2.2, unless you're doing something very unusual. Gamma correction is an operation used to correct for the non-linear way human visual perception works with respect to luminance.
- Gamut — you can safely use your monitor's full native gamut, but ideally you'd load a custom printer profile to define the gamut target of your particular paper and printer combination for the most accurate results. This is a form of advanced soft-proofing, done in hardware.
A quick side note on the D50 standard: 5000K was essentially chosen as the 'standard' temperature for print viewing (and what most colour management systems are built around) because it best represents an average mix of typical indoor (roughly 3000–4000K) and typical outdoor (roughly 4000–9000K) light. This is distinct from, for example, the textile printing industry, whose profiles tend to be made under D65 to more closely match the outdoor-only viewing conditions of something like a sports jersey.
Environmental Lighting Conditions
Environmental lighting conditions (ambient or room lighting) are equally important to the accurate perception of your monitor's colour, in two ways:
- A neutral environment. Ideally, your environment should be as neutral as possible — the perfect setup is a room painted a neutral matt grey with a defined, even spectral output across the visible spectrum, and low luminous reflectance. Not everyone wants to paint their work room grey, but it's worth knowing that strongly coloured walls, objects, or even the clothes you're wearing can have a large effect on how you perceive your screen and print colours. Warm yellow walls, for example, are likely to make you edit images with a bias towards cool, as you subconsciously compensate for the overly warm light.
- Environmental illumination levels. As defined in ISO 3664, your room lighting level must be below 64 lux, and should ideally sit at or below 32 lux. You want the colour temperature of this light reasonably closely matched to your monitor's white point.
Print Viewing Light Control
The lighting characteristics needed to accurately view prints, for evaluating a screen-to-print match, are covered in ISO 3664. Specifically, the P2 condition is what we're after, but we'll include the P1 figures too, for reference.
P1 — Critical Evaluation of Prints. This condition is used for comparing two prints, or a physical original against a print reproduction. It's not suitable for print-to-screen matching, as it's far too bright. For reference, P1 specifies D50 (5000K), 2000lx ± 500lx (should be ± 250lx), CRI >90, and surrounding environmental luminous reflectance <60% (neutral and matt). Most colour management systems are built around these conditions.
P2 — Practical Appraisal of Prints. This is the condition for comparing a print against an ISO 12646-calibrated monitor within ISO 3664 environmental lighting. It specifies D50 (5000K), 500lx ± 125lx, CRI >90, and surrounding environmental luminous reflectance <60% (neutral and matt).
You'll need a light that fits these requirements — consistent, accurate colour temperature, variably stepped brightness adjustment, and a high Colour Rendering Index. More on suitable options below.
Final Viewing Conditions
So, why 500lx for P2?
If you take an average sheet of neutral white fine art paper and view it under 500lx illumination, it gives a very close visual match to a monitor brightness of 80–90cd.
500lx is also a good average figure for the light level in a typical Australian room during the day — though lighting levels within buildings vary a lot. A typical room might sit around 500lx, a room with large windows can reach up to 2000lx, and at night under artificial light it might drop to 200–300lx. Exhibitions, galleries and photographic competition judging are also generally significantly above 500lx (ISO 3664 recommends P1 conditions for judging and exhibiting photographs).
And that's just brightness — before you even get to temperature or Colour Rendering Index.
Unfortunately, when it comes to viewing prints, there's no single standard for brightness or temperature, and you can't really control the final environment your prints will end up in (unless it's your own home). So the best approach for most people is to print for a reasonable average, and accept that the final viewing environment is fundamentally out of your control. Hence the 500lx average.

Colour-Accurate Lighting
A proper print viewing booth (from the likes of GTI) is slick, professional and easy to use — and unfortunately, really not cheap. They can also be bulky and quite unattractive, which isn't ideal for a nice home studio or small space.
An easier and significantly cheaper approach is a good dedicated lamp rather than an expensive viewing booth. Choose the right one and it offers sufficient accuracy for almost all normal print viewing tasks.
You do need a genuinely good quality light source, though — no cheap, spectrally peaky, home-grade bulbs. You want consistent and accurate colour temperature settings, brightness adjustment, and a high CRI/Ra.
There have been several lamp options over the years that fit this bill (Solux, GTI, Fiilex, GrafiLite, Just-Normlicht and others), but since its release in 2023, the clear favourite in this category is the Ilford Ilfolux. It's very affordable for this category of light, works extremely well, and has excellent, easy-to-use controls. It comes with a table stand and includes a clamp. A single lamp comfortably and accurately lights an A3-sized area or so, so if you're a typical home-studio A2 printer owner, you might even want a couple.

Quick Recap
Following everything above:
- We're closely matching the monitor's luminance to a 'typical' print viewing environment (80cd ≈ 500lx).
- We're restricting the monitor's contrast ratio to match the characteristics of paper (which only has a limited possible contrast ratio).
- We're using a standard gamma of 2.2.
- We're either using our monitor's full native gamut, or using a printer profile to define the output device's gamut.
- Our monitor sits in a neutral, <32 lux environment.
- Our print sits in a separate, high-CRI, 500lx environment at D50, surrounded by a neutral matt space with environmental luminous reflectance <60%. An Ilford Ilfolux is a good fit here.
- The one real point of difference is white point: 5800K as a compromise to optimise the monitor's performance without degrading it spectrally, and D50 for print viewing, as per the standard.
Additional Factors
Chromatic Adaptation and Colour Constancy
You might be thinking: if we've calibrated our monitor to 5800K but our print viewing light source is 5000K, how could they possibly match?
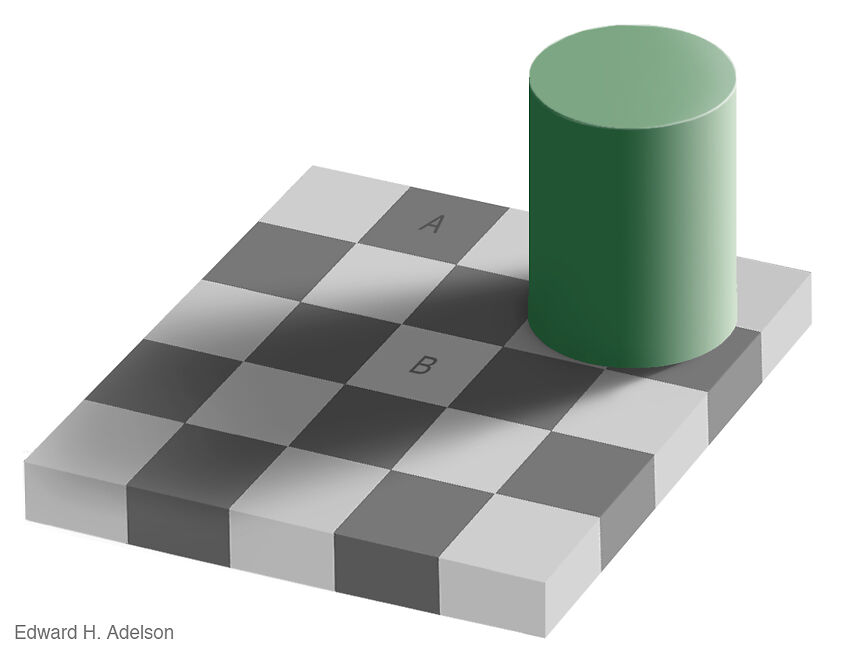
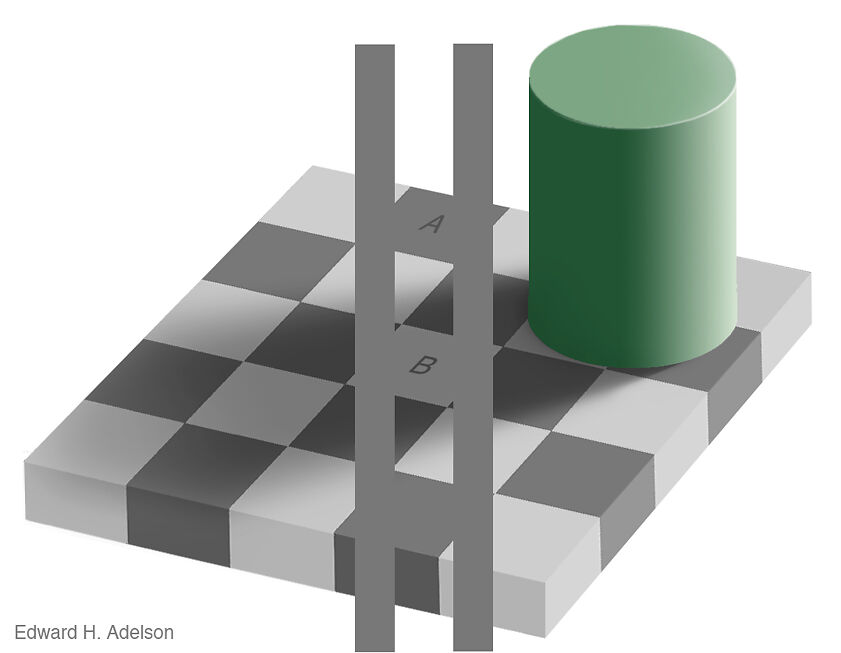
Let us introduce chromatic adaptation — broadly, the ability of the human visual system to discount the colour temperature of the illumination, and to approximately preserve the appearance of an object under a wide range of light sources.
Jeremy explains it well in his book:
The human eye is an automatic adaptor — this is great for us, as it means when we move between different contexts (say, indoors under warm interior lights to outdoors under a cool blue sky), we don't experience massive, jarring colour shifts as the colour of light changes. We basically don't perceive the colour of light changing at all, unless it's a very significant shift. Devices like cameras, however, don't automatically adapt in the same way.
For example, look at a green apple outside under bright midday sun — it looks green, as expected. Wait several hours and look at the same apple at sunset, and it still looks green, despite the light now being much warmer. Based on the colour shift of surrounding objects and the environment, the brain effectively compensates for differing lighting scenarios and interprets objects as a roughly stable colour under varying illumination. This is known as colour constancy.
What this means for us: because we can't view print and screen together under the same lighting (each requires different conditions for optimal viewing), we can safely view each one independently, under independently controlled lighting, and — despite the different white points — let our eye's natural chromatic adaptation compensate for these slight temperature differences. The result is a more accurate overall comparison than viewing them side by side.
A Note on Soft-Proofing
One last point that can help you get the last 5% of the way to as close a screen-to-print match as possible: soft-proofing.
Soft-proofing in Photoshop can be very precise and effective, but it takes some time to get familiar with, and a good understanding of what it's trying to show you is essential to getting the most out of it.
Our ICC Profiles page and our article on advanced soft-proofing with Eizo ColorEdge monitors are both worth a read if you want to go further.
In essence, soft-proofing uses a custom ICC printer profile — which accurately characterises the qualities and response of a particular paper on your exact printer — to give you a colour-accurate on-screen proof of how your image will look once printed. It's designed to show you what changes the printing process will cause to your image.
There are a few levels to soft-proofing. Basic soft-proofing shows you the colour shifts introduced when printing your image on a particular paper, plus any out-of-gamut colours (if enabled). This tends to be the most perceptually accurate form of soft-proofing, giving you the best overall impression.
A more advanced form of soft-proofing also shows base paper tone, precise contrast changes, out-of-gamut colours, black ink density/tonality, and the effect of different rendering intents. To an untrained eye, advanced soft-proofing can be a bit of a shock, as the sudden drop in contrast in particular can cause confusion — it's a more technically accurate process, but a less perceptually accurate one. It's useful for checking shadow and highlight detail levels, though.
Alternatively, if you have a good-quality hardware-calibratable monitor, such as an Eizo CG or CS series, you can load a custom printer profile to define the gamut target of your particular paper and printer combination at the hardware level, for the most accurate results. This is a form of advanced soft-proofing done in hardware.

Conclusion
That's really all you need to know. Follow the techniques and specifications above and you'll be in the best position possible to accurately compare prints to your monitor.
If you want to go a bit deeper technically, keep reading below — but feel free to stop here too, as what follows isn't essential unless you want a deeper level of understanding.
A Technical Sidebar
Black Body Radiators
The 'ideal' emission spectrum of the 'perfect' light source would be that of a black body radiator at a defined temperature. The true definition is quite complex, but for our purposes, black body radiators have a continuous, even spectrum of emission — they give off light at all wavelengths, without major deficiencies or peaks, other than the primary one related to their temperature.
One of the most familiar light sources that closely approximates a black body radiator is the humble incandescent filament lamp. Because it emits light by electrically heating a metallic element until it glows, it produces a fairly even distribution of spectral power, without many deficiencies or peaks. However, since its light output is tied directly to its heating, varying the bulb's temperature in practice is difficult, running into physical limitations of the materials involved. Incandescent bulbs are also extremely inefficient — converting less than 5% (sometimes as low as 2%) of their input power into light, with the rest lost mainly as heat — and they have short lifespans and take time to warm up. Not ideal characteristics for a monitor backlight.

Human Vision
Normal human vision is trichromatic — we have only three colour receptors. The three types of cone cells (Short, Medium and Long) are each most sensitive to different wavelengths of light: Short around 420–440nm (peaking at 420nm), Medium around 534–545nm (peaking at 530nm), and Long around 564–580nm (peaking at 560nm). Their sensitivity to a given wavelength decreases the further it is from each cone's respective peak.
These can be broadly characterised as blue, bluish-green and yellowish-green respectively, often reductively summarised as blue, green and red.

In normal vision, a range of wavelengths stimulates each of the three receptors to varying degrees, and the brain combines this differential stimulus to produce the perception of colour.
Cone cells (particularly Medium and Long) are almost never fully independently activated — more than one is almost always activated to some degree alongside another. When viewing what we'd call 'yellow', for example, the wavelengths involved activate the Medium (green) and Long (red) cones simultaneously, while barely stimulating the Short (blue) cones at all.
Very broadly speaking:
| Wavelength | Perceived Colour | Cone Cell Activation |
|---|---|---|
| 400nm | Violet | Short and Long |
| 450nm | Blue | Short |
| 480nm | Cyan | Short and Medium |
| 530nm | Green | Medium |
| 580nm | Yellow | Medium and Long |
| 650nm | Red | Long |
A note on the table above: Medium (green) cones physically can't be activated completely on their own. If a Medium cone were independently activated, with no stimulation of the other two cones at all, we'd perceive an impossible 'hyper-green' colour — not only impossible to see, but impossible to comprehend or describe.
On sensitivity: Short cones have an approximate relative sensitivity of about 60% for 466nm light — think of this as roughly 6 out of every 10 photons of 466nm light hitting the eye being absorbed. This sensitivity drops to around 30% for 479nm light — around 3 out of every 10 photons absorbed. This means a 479nm source would need to be twice as bright (providing double the photons) as a 466nm source to generate the same level of stimulation.
Think of it this way: shining a 466nm light with an arbitrary intensity of '10' (60% of 10 = 0.6) on a Short cone produces the exact same stimulation as shining a 479nm light with an intensity of '20' (30% of 20 = 0.6). The Short cones alone can't distinguish between these two sources, since they're providing the same level of stimulation — these two theoretical sources are metamers (more on this shortly). Any single cone cell by itself can confuse two light sources, as long as the intensity of each matches the sensitivity at that wavelength.
In practice, this means all 'colours' are essentially reduced to three sensory quantities — commonly represented numerically as tristimulus values — describing the degree to which each cone cell is stimulated. Because each cone type responds to cumulative energy across a broad range of wavelengths, different combinations of wavelengths can produce an equivalent receptor response (and the same tristimulus values, or 'colour sensation'), even when the light sources involved are spectrally quite different.
This leads us nicely into the issue of metamerism, or more specifically, metameric failure.
Metamerism
The true definition of metamerism (and metameric failure) is genuinely complicated, but here's a brief summary of the key points.
As just discussed, the human visual system reduces the spectrum of light hitting the eye down to just three 'coordinates'. Because of this, there's a near-infinite number of spectra that can produce colours that look the same to us. Spectra that resolve to the same colour in human vision are called metamers.
A metameric match occurs when two colour samples, illuminated by two light sources with different spectra, are perceived as the same colour. Metameric failure is the opposite: two colour samples that appear to match under one light source no longer match under a different light source with a different spectrum, despite our eye's chromatic adaptation telling us they're both equally 'white'.
Put plainly: it's the phenomenon where something you're viewing changes colour unpredictably under different light sources containing a different mix of wavelengths.
What this means for us in a practical printing sense: say you achieve nice, neutral greys from an inkjet printer — or so you think — when viewed under a high-quality print viewing lamp. Take that same print outside, and it suddenly shifts, taking on an unpleasant cyan or magenta cast. This is fundamentally an unsolvable problem without significantly changing the composition of the inks involved, which most printers don't have the luxury of doing. We have to work within these constraints, because we have no other choice.
Backlighting Technologies
Broadly speaking, in our domain there are two predominant monitor backlighting technologies in wide use: the older, now less common Cold Cathode Fluorescent Lamp (CCFL), and the newer, more common Light Emitting Diode (LED).
There are technically several more backlight technologies, and further subsets of each, but the most common are:
- Standard CCFL
- Wide gamut CCFL
- White LED (the most common technology in use today)
- RGB LED
- GB-LED
- PFS-phosphor
We won't go into CCFL too much, since it largely stopped being produced around 2010 and is fairly rare today. It's fundamentally a phosphor-based technology (similar to fluorescent tubes), and it's missing several wavelengths of light, which makes it less than ideal.

White LEDs are used in nearly all standard 'LED' monitors today. Despite the name, though, 'white' LEDs are actually blue LEDs with a yellow phosphor layer over the top, converting some of that blue light into the red and green needed to create the illusion of white. There's still a large blue peak mixed in — it's not true white light, just an impression of it. Looking at the spectral curves for white LEDs, they're quite 'peaky', with a strong blue peak and a broader yellow/red region, compared to sunlight. This 'white' light is then filtered through the individual red, green and blue filters within the LCD panel to produce a spectrum of colour (and to refine the white point away from native — more on this shortly).

RGB LED — a lot less common in our domain — uses three individual LEDs, one for each primary colour, mixed together to form white light. On the surface, this remedies the pitfalls of White LED (and gives wider gamuts), but the mixing needs fairly complicated electronic circuits, making a perfectly neutral, stable white colour temperature difficult to produce (individual diodes degrade at different rates over time, causing colour imbalances). Because different coloured LEDs have different spectral power distributions, colour balance can also shift depending on viewing angle, even within a single package. And since the resultant 'white' light is a combination of three individually constructed primaries, RGB LED backlights tend to be quite peaky too. In short, they're expensive to produce, larger, heavier, and use more power.
GB-LED (or GB-r LED) stands for Green-Blue LED. Rather than a blue diode coated in yellow phosphor, this combines individual blue and green diodes with a red phosphor layer, creating strong, distinct spectral peaks for blue, green and red, rather than a blue peak with a broad yellow/red region as in White LED. It's still very peaky — the classic triple peak.

PFS-phosphor is similar to White LED, adding a narrower-band red phosphor called potassium fluorosilicate (PFS) alongside other phosphors (such as Ce:YAG) to boost red light generation. As blue light passes through both phosphors, the more traditional phosphor converts it to green and red/yellow light, as in White LED, while the additional PFS phosphor converts blue light to extra narrow-band red light. This means colour temperature can be controlled more precisely by adjusting the concentration and mix of each phosphor during manufacturing.

Monitor Native White Point
Whatever the resultant emission spectrum of the technology used to create 'white' light, that light has a 'hardcoded' colour temperature inherent to the design of that specific diode package. This is the native white point of a monitor — the natural, default colour temperature of the backlight before it's filtered through the panel. In the vast majority of cases, this is designed to sit around 6500K (D65), the standard ISO 3664 temperature for screen-based work.
However that approximation of white light is constructed, it then has to be filtered through the individual red, green and blue sub-pixel filters within the LCD panel to produce a spectrum of colour (and to refine the white point away from native). This filtering reduces the backlight's initial spectral energy considerably, since energy is lost as the LCD blocks light, and because the filtering isn't perfect (no sharp pass/attenuation properties — think 'colour crosstalk'), the backlight's spectral imbalance remains an underlying issue. A typical White LED panel makes good use of the very blue-heavy spectral emission from its underlying blue diode; the red and green components, coming from the phosphor coating, are comparatively weaker, and so are comparatively harder colours to generate.
Operating a monitor at its native white point gives maximum accuracy, performance, stability and consistency, since minimal LCD panel filtering needs to take place — but as we've discussed, that native 6500K isn't optimal for printing. The further the temperature is pushed from native, the more filtering the LCD panel has to do, and the less spectrally accurate the result becomes. Because it has a strong blue component, the warmer we push the monitor, the more filtering has to occur, relying more heavily on the weaker phosphor-generated component to produce the wavelengths needed for those warmer tones.
In short, the further you get from D65, the less spectrally accurate a monitor becomes. For a lot of monitors, 5000K is simply too far, filtering out too many wavelengths of light. 5800K is a middle-ground compromise: warming up from D65 towards D50, without going so far that things get spectrally messy.
Get the Right Gear for Screen-to-Print Matching
- Ilford Ilfolux Colour Viewing Lamp — for accurate, high-CRI print viewing conditions
- Eizo Monitors — hardware-calibratable monitors that support advanced soft-proofing in hardware
- Custom Printer Profiling — a custom ICC profile for your specific printer and paper, the foundation of accurate soft-proofing
- ICC Profiles — more on what ICC profiles are and how they're used
